
Introduction
Hey there, fellow enthusiasts! Lately, I’ve noticed a surge in curiosity about integrating Amber Electric solar inverter throttle with Home Assistant setups, especially to synchronise with Amber Electric’s dynamic live wholesale prices. This growing interest has inspired me to launch this blog – a dedicated space for those passionate about smart home technology. It’s a pleasure to introduce you to our first post, which aims to offer a comprehensive, yet user-friendly guide for those eager to embark on this smart home journey.
For the past year, I’ve been operating this system, marvelling at its potent efficiency and advanced capabilities. However, I need a hand from our community. During the initial installation, I didn’t meticulously document each step. Now, as I try to recreate the process for this blog, there might be some missed subtleties. I’m keen to hear your insights. If you notice any omissions or have suggestions, feel free to drop a comment below. Together, we can refine this guide to benefit all enthusiasts.
Now, let’s get down to the nitty-gritty.
Want to get started quickly?
Discover the convenience of our pre-configured Amber Electric Curtailment Controller devices, available now in our online store. These tailor-made solutions are designed for quick and effortless setup. Once you make your purchase, one of our skilled engineers will reach out to you. They’ll assist with configuring integrations and ensure everything is up and running smoothly, so you can start enjoying your smart home experience in no time!
Why wait? Transform your home into a smart haven today with our Home Assistant devices!
Making Connections with Amber Electric
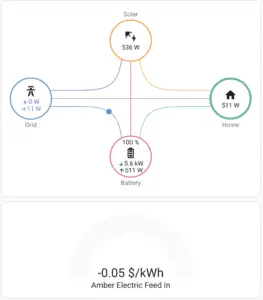
You might wonder, “How does Amber Electric fit into all this?” Here’s the scoop: Amber Electric is famed for its real-time wholesale energy pricing, which can be a powerful tool for achieving more cost-effective energy management at home. Considering the fluctuating rates of solar feed-in and consumption, sometimes you’ll want to dial back on usage, keeping an eye on how much solar surplus is being added to the grid.
You can craft a more coordinated and cost-friendly home energy management system by teaming up the Fronius inverter’s automated soft limit feature with Amber Electric. This collaboration helps you maximise your solar energy and stay in tune with the ever-changing energy rates, potentially padding your wallet more!
We’re Eager to Hear Your Thoughts
Embarking on home automation projects like this one is genuinely exhilarating, more so when it dovetails with the innovative solutions from Amber Electric. We’re excited to hear about your experiences and, who knows, maybe glean some golden tips from your adventures. Feel free to share!
Hardware & Software Requirements
The procedures outlined in this guide have been verified using specific hardware and a single Fronius inverter. If your setup includes multiple inverters, it’s essential to configure them in a master/follower arrangement to guarantee effective energy curtailment.
Core Hardware
-
-
- Raspberry Pi, PC, or Server running Home Assistant: To host your Home Assistant instance.
- Wi-Fi Router or Ethernet Switch: To ensure all your devices are connected and can communicate with each other.
-
Energy Components
-
-
- Solar Inverter: A compatible model that supports Modbus communication.
-
Software
-
-
- Home Assistant Software: Either the Home Assistant OS, Home Assistant Container, or Home Assistant Supervised, based on your preference and hardware.
- Amber Electric API Key: You’ll need this to interact with Amber Electric’s real-time pricing.
-
Step 1 – Get going with Home Assistant
I won’t detail setting up a Home Assistant (HA) instance. If this is your first HA automation, I suggest you familiarise yourself with the basics. You are going to need it since this requires an intermediate understanding of the platform – my recommended reading and viewing links.
Reading
Viewing
Step 2 – Setup Home Assistant Amber Electric API
Add the Home Assistant Amber Electric API to your Home Assistant instance.

Step 3 – Configure your Fronius Inverter
We’d appreciate your input if you’ve set this up with a different inverter. Feel free to share your insights in a similar format, and we’ll find a way to feature them on this site, assisting enthusiasts of SMA, Enphase, and SolarEdge.
What’s the objective?
Normally, inverters harness the sun’s energy, converting it into electricity supplied to the grid for profit or consumption. However, with Amber Electric, there are moments when the solar feed-in tariff turns negative due to an abundance of green energy in the grid, resulting in charges for your feed-in. This setup enables your inverter to automatically match the energy demands of your home at any given time and restrict the feed into the grid, preventing unnecessary charges.
How do we achieve Amber Electric Solar Inverter Throttle with Home Assistant?
Most popular inverters can modulate their power output with the help of a communication protocol called Modbus. In this guide, we will use this feature to activate it based on the current pricing from Amber Electric through the Home Assistant API.
Getting to know modbus
Modbus is a communication protocol predominantly utilised to connect electronic devices. It enjoys widespread use in industrial environments and home automation setups owing to its ease of implementation and extensive adoption.
Caution
Please note that modifying settings within your inverter comes with certain risks. It’s advisable to capture screenshots before and after the changes to safeguard against any unusual occurrences, allowing you to restore the original configurations if necessary.
Time to Set Up Your Inverter
1. Access Your Inverter’s Interface:
Open your browser and log in to your inverter using the ‘service’ account – http://192.168.1.x
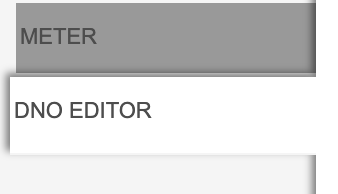
2. Find the DNO Editor:
Use the settings menu on the right-hand side to navigate to the DNO Editor. Navigate to DNO Editor via the settings menu on the right hand side.
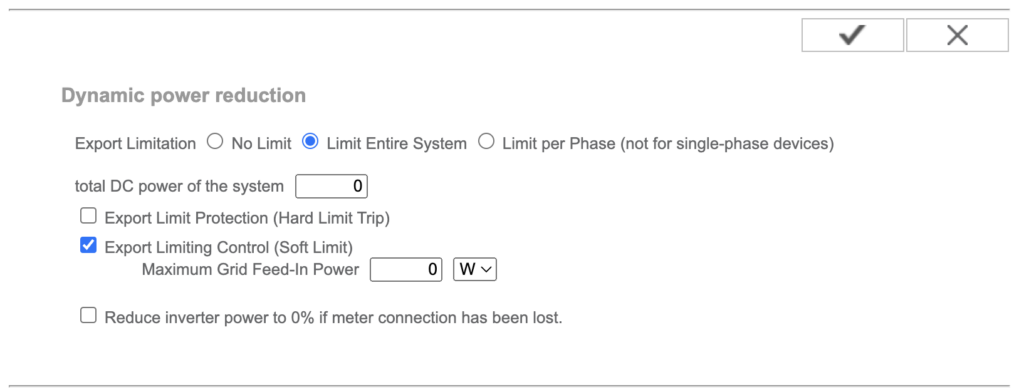
3. Enable Dynamic power reduction:
To limit the output when throttling is enabled set the “Export Limiting Control (Soft Limit)” to 0W.
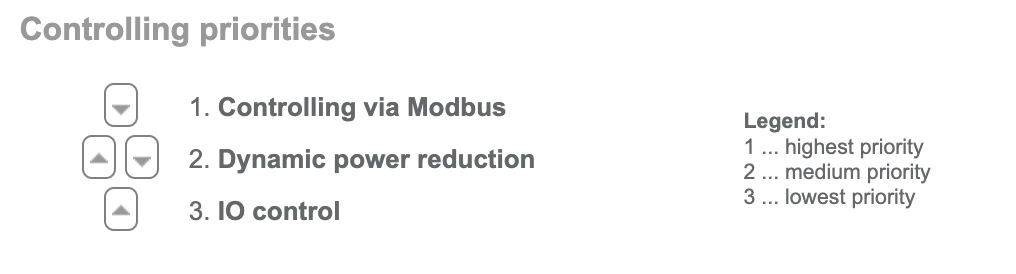
4. Adjust Controlling Priorities:
Modify the controlling priorities sequence to favour Modbus. Use the arrows provided to adjust the priority.
5. Set Up Modbus:
Proceed to the Modbus menu and configure it to accept commands on port 502, with the String control address offset set to 101 (default). Note: I’ve only tested this with the ‘int + SF’ option as the Sunspec Model Type.

You’re all set! Your inverter is primed to receive Modbus commands from Home Assistant.
Step 4 – Define a sensor which triggers when Amber Electric price is negative
Create a sensor within configuration.yaml that triggers true when the Amber Electric API feed in price goes negative.
sensor:
 - platform: template
   sensors:
     amber_feedin_price_negative:
       value_template:  '{{ states.sensor.solar_array_feed_in_price.state | multiply(100) | int(1) <= 0 }}'
       availability_template: '{{ states.sensor.solar_array_feed_in_price.state not in ["unavailable", "unknown"] }}'
Step 5 – Establish a Home Assistant Automation to Curtail Inverter Output
It’s time to initiate your first Home Assistant (HA) automation to assess your setup. (Tip: Conduct this test during the day, as evaluating it at night is challenging!)
The following automation disables the WMaxLim_Ena (Watt Maximum Limit Enabled), allowing the system to only produce enough energy to meet your home’s needs.
Note: Although the automation sets the address to 40236, the actual register is 40237 due to a ‘String control address offset’ of 1 set in step 2.

Refer to this link for the complete set of Modbus registers available for the ‘Fronius Gen24 Primo/Symo Inverter with Integer+SF Inverter Model’
alias: Throttle Fronius
description: >-
  Throttle Fronius to what is defined in export limit within the inverter ie 0W
  because price is negative
trigger:
  - platform: state
    entity_id:
      - sensor.amber_feedin_price_negative
    to: "True"
condition: null
action:
  - service: modbus.write_register
    data:
      unit: 1
      hub: mb_fronius
      address: 40236
      value: "0"
mode: single
Step 6 – Enabling Modbus Connection in Home Assistant
To integrate Modbus within your Home Assistant setup, you’ll need to make some modifications to the configuration.yaml file and do a full restart. The name must match ‘hub’ data attribute in the above automation.
Breaking change: Since the rollout of Home Assistant version 2024.4, there’s a change in the setup process. You’ll need to introduce what’s termed a ‘dummy’ sensor, which I’ve dubbed ‘primo_throttle’ in the example. This update is detailed in the release notes.
modbus:
  - type: tcp
    name: mb_fronius
    host: 192.168.x.x
    port: 502
    binary_sensors:
      - name: primo_throttle
        address: 440236
Step 7 – Enable Full Operation of the Inverter When the Solar Feed-In Price is Positive
This automation adjusts the WMaxLimPct (Watt Maximum Limit Percent) register to 100% (10000), deactivating the throttle.

Note: To alter the percentage, first turn off the throttle control, adjust the settings, and then re-enable it, as illustrated by the three Modbus service calls below.
alias: "FIX: Fronius 100%"
description: Enable Fronius 100% if feed in price is positive
trigger:
  - platform: state
    entity_id:
      - sensor.amber_feedin_price_negative
    to: "False"
condition: []
action:
  - service: modbus.write_register
    data:
      unit: 1
      hub: mb_fronius
      address: 40236
      value: "0"
  - service: modbus.write_register
    data:
      unit: 1
      hub: mb_fronius
      address: 40232
      value: "10000"
  - service: modbus.write_register
    data:
      unit: 1
      hub: mb_fronius
      address: 40236
      value: "1"
mode: single
Step 8 – Test you Home Assistant Curtailment!
Run the “Throttle Fronius” defined in Step 5 and you should see your Amber Electric Solar Inverter Curtailment with Home Assistant in action.
Did this help, if so, Buy Me A Coffee
Tips from our user community!
Thanks to @Jim
One issue I did have was that curtailment kept turning off after 6 minutes. I found that this was due to another register setting – 40234 (WMaxLimPct_RvrtTms), which was set to 360 seconds, thus every time curtailment was enabled with register 40236 set to 1, after 6 minutes passed, register 40236 would reset back to zero and the curtailment would stop. To fix this, I had to add in another action to set 40234 to zero before setting 40236 to 1, which disables this resetting.
Hi – great work putting this together, just a small question on syntax. Why does the dummy variable in the modbus declaration have the number 440236 rather than the address which is 40236? When I use the address 40236 it just says “unavailable”.
binary_sensors:
– name: primo_throttle
address: 440236
Hi, I’m back to answer my own question and also offer hat I think is a more useful solution. Rather than create a dummy sensor why not create real ones! I’m basically reading the 2 addresses we are writing to, it’s useful for de-bugging at least 🙂
modbus:
– name: mb_fronius_gen24
type: tcp
host: 192.168.X.X
port: 502
binary_sensors:
– name: fronius_throttle_gen24
address: 40236
slave: 1
input_type: holding
scan_interval: 2
sensors:
– name: fronius_gen24_throttle_percent
slave: 1
address: 40232
unit_of_measurement: ‘ ‘
data_type: uint16
scan_interval: 2
Can someone please help me with the below.
sensor:
– platform: template
sensors:
amber_feedin_price_negative:
value_template: ‘{{ states.sensor.solar_array_feed_in_price.state | multiply(100) | int(1) <= 0 }}'
availability_template: '{{ states.sensor.solar_array_feed_in_price.state not in ["unavailable", "unknown"] }}'
I have put it in the configuration.yaml file am able to see the sensor but is always in an unknown status even if feed in price is negative. Amber and Fronius integrations have been installed and working if it helps.
Assistance would be appreciated.
Hi Joe,
The sensor config is for the outdated template. A bit of working and trial and error and I have it detecting appropriately on mine now.
template:
– sensor:
– name: “amber_feedin_price_negative”
state: “{{ states(‘sensor.NAMEOFYOURAMBERFEEDINSENSOR’) | float(0) <=0 }}"
The states will be False or True.
If the feed in price is below 0, the sensor will change to True, if it goes above 0, it will change to False.
Confirming the other modbus settings have worked for myself, it was just the sensor setup that was needing a rework in my case
Hey, from what I understand, the curtailment should drop the inverter down to output what the house is using?
I have set the curtailment to cut in when negative FIT and when my powerwall is above 99% charged.
The automation runs but the inverter drops to 25watts and the house just starts pulling from the battery.
Any way to leave the battery charged and the inverter to just power the house?
Cheers
Absolutely, you’re on the right track, but fine-tuning the system to behave as you’d like can be a bit intricate. It’s all about the interplay between your inverter, battery, and the house’s energy demands. There are a few strategies we could explore to keep your battery charged while ensuring the inverter supplies power directly to your house. I’d be happy to dive into the specifics of your setup and help tailor a solution that meets your needs. Feel free to reach out via https://www.smartmotion.life/contact/
Cool. thanks, I have sent some stuff through to that address 🙂
I apologise for all these posts, but please ignore them. In some comms with the developer of Modbus I have confirmed that I have the wrong register Map. When he read register 40233 he got 10000 as you are supposed to, not like my reading.
I think the one published above is for the Gen24 and my inverter is a Primo 6.0-1 snapINverter. I will go looking for a copy and see if i can get hold of Fronius. If you think you do have one and can share it that would be great.
Peter
What reading did you get on your inverter? I have a Fronius Primo 6.01
Also what are your modbus settings.
OK – it must have been when I tried to state that I am reading them as unsigned integers 16.
Github link is https://github.com/RonnyWinkler/homey.modbus
I tried to enter the data I read from the registers but as soon as I did I was blocked from posting. I’m not sure which part of the sentence caused the problem, I get the following data for 233, 234, 235, 236, 237 –
0, 11665, 44116, 65535, 65535
Thanks for your response. Is that the same when reading the data from these registers? I’ve been trying to make sense of the data I read from the registers before I try to write to them. Being cautious.
What I don’t know is how I interpret those values into the values expected in a/w the mapping spreadsheet, and therefore how I write the data to the registers. As I said above I am not using HA (I think I’m going to have to bite that bullet soon though). I’m using my Homey Pro with a Modbus program installed on it. I have the Github address for his code but when I put it in I wasn’t allowed to post.
I understand if you can’t help and I’m probably asking a lot here. Still I will be interested in your response.
I am also very knew to this and this guide is great, even though I won’t be using HA. Could you please clarify a couple of things for me.
Register 40236 is WMaxLimPct_RmpTms setting it to 0 means go straight to the new value you set, but you don’t set 40233 WMaxLimPct – I’m sure it’s correct I would just like to understand the logic.
From what I understand the result is that Step 5 sets the inverter to produce 0W when the FIT price goes -ve and then Step 7 reverts it back to full production. When you write to the Conn register in this step is that to get the inverter out of Standby?
In a video I found given by Fronius Australia staff (https://www.youtube.com/watch?v=UMR_4rqxZts) they laid out the steps to limit output at various levels for various periods of time. e.g. to limit output to 50% and stay at 50% indefinitely then:
Set 40233 -> 5000, 40234->0, 40235->0, 40236->0 and 40237->1
Do you agree with this? Have I missed something?
Hope this all makes sense.
Thanks for some great questions. In your logic below remember that there is a ‘String control address offset’, I note this in Step 5 (I’ve just made it bold).
So in your statement above when you see 40236 it is actually setting 40237 (Throttle enable/disable control.), likewise 40232 is actually setting 40233 (Set power output to specified level.).
Assuming your inverter has the same setup of string control address offset (Step 3.5) then to limit to 50% I would do:
[Using the registers] – Set 40237->0, 40233->5000, 40234->0, 40235->0, 40236->0, 40237->1
Since there is an offset of 1 the actual addresses to send should be
Set 40236->0, 40232->5000, 40233->0, 40234->0, 40235->0, 40236->1
FWIW: I have never set WMaxLimPct_WinTms, WMaxLimPct_RvrtTms or WMaxLimPct_RmpTms however I understand your logic and it looks reasonable. If it doesn’t work then I suggest you drop them and try.
Hope this helps.
Hi, looks great but I am new to all this, Are you able to put up a section that I would need to use if the amber grid price goes negative that HA will cut solar output.
This way i maximise my grid usage when I am getting paid to use it. Not to worried about neg solar price as I have no consumption meter so if i cut output I would still have to pay for power.
I have a Fronius Primo 3.0
Cheers
If you ever upgrade and want to sell your Primo 3.0 I would buy it.
I have it working with modbus control when i manually run now. Just not sure if I set the sensor up right.
This is what I have.
– platform: template
sensors:
amber_home_general_price_negative:
value_template: ‘{{ states.sensor.home_general_price | multiply(100) | int(1) <= 0 }}'
availability_template: '{{ states.sensor.home_general_price.state not in ["unavailable", "unknown"] }}'
When I click on the enity it says unknown, should it be true or false? Or will it only update when the it changes state (grid go into the neg)
Very handy guide.
The only flaw is that setting the inverter to go full-bore is a problem for people with limited export agreements.
Have you had any luck getting the current details out of the inverter via mobus? I figure we could use that to dynamically set the export percentage. I know the fronius integration via solar web kinda gives us that information, but I’d rather things stay local if possible, not to mention be polling much faster.
Note: Another flaw is batteries. Setting the export limit to 0 can also stop your battery from charging.
> The only flaw is that setting the inverter to go full-bore is a problem for people with limited export agreements.
Depending on the export agreement you could easily curtail the output.
> Have you had any luck getting the current details out of the inverter via mobus? I figure we could use that to dynamically set the export percentage. I know the fronius integration via solar web kinda gives us that information, but I’d rather things stay local if possible, not to mention be polling much faster.
I started doing this and it worked fine, however HA needed to consistently send the amount of available power depending on load. I moved to this since the Fronius does the heavy lifting as per step 3.5 above.
> Note: Another flaw is batteries. Setting the export limit to 0 can also stop your battery from charging.
Agree, however you could easily adapt this to trigger charging accordingly.
Thanks for this guide. An important step you haven’t mentioned is adding the following to configuration.yaml:
modbus:
– type: tcp
name: mb_fronius
host: 192.168.x.x
port: 502
retries: 3
I also found that you then need to do a full restart of HA (not just quick restart) for it to work.
Cheers.
Thanks, good pickup! I’ve now added it as Step 6
Great work! just one thing .. “retry_on_empty” is deprecated, and assumes “true” without it needing to be specified. See:
https://github.com/home-assistant/core/pull/100292
How did you manage to get the service password for your inverter? I’m hitting a brick wall with my installer as they’ve said I can’t have it due to Energex laws. I’ve even tried asking them to come out and I’d pay a service fee for them to turn on Dynamic power control. Their response was they don’t know if they can and I should just wait for Amber to release a document saying what they have approved.
I have the MODBUS control working as is but without the dynamic power reduction I am reading the house load every 10 secs and ramping the % up and down myself. Its not ideal as aircon fluctuates up and down all day so depends on where it is in the 10 sec cycle I end up exporting or drawing from battery a bit.
Did you end up getting a service password?
Log a support call with Fronius and they will send you the service password.
Great write up!
I’ve been putting off doing this for a while as I just wasn’t certain how to do the modbus changes. Your blog simplified it all one spot so got the basics working easily.
Kind of off topic (unless it’s the inverter doing this) but do you know how Amber interfaces with a powerwall to dispatch energy to the grid when using SmartShift? Is there a way to control this in HA I wonder?
Smartshift is great, but it always seems to aggressively buy from the grid when there’s plenty of sun throughout the day to charge the PW 2 times over. It’s not very good at predicting solar. I think it could be done better through HA triggers, dispatching when there price is peaking and charging when it’s negative, etc.
I am not aware how Amber to SmartShift, however I do agree that HA provides a lot more flexibility depending on your configuration.
Thanks for providing this blog. I managed to get curtailment working though I had to use your thread over on the Home Assistant community to set up modbus correctly first.
One issue I did have was that curtailment kept turning off after 6 minutes. I found that this was due to another register setting – 40234 (WMaxLimPct_RvrtTms), which was set to 360 seconds, thus every time curtailment was enabled with register 40236 set to 1, after 6 minutes passed, register 40236 would reset back to zero and the curtailment would stop. To fix this, I had to add in another action to set 40234 to zero before setting 40236 to 1, which disables this resetting.
That is great, I’ll add this into the blog.
Is the Modbus address and values safe to use across all Fronius inverters? Should I just copy and paste and see what happens or do I need to be cautious here?
I have the Primo GEN24 5.0 and the menu looks slightly different when accessing via browser.
The Fronius Gen24 Primo/Symo Inverters have the same register map as per the below link. I suggest you test by running the automation in ‘Step – 5’ which should curtail your inverter.
https://www.smartmotion.life/wp-content/uploads/2023/09/Fronius_Inverter_Register_Map_with_IntegerSF_Inverter_Model.xlsx
I would also check the Sunspec model type ensuring that it is Int+SF as per step 3.5
Should I be seeing any changes to the config in the web browser settings if I run the automation? I don’t see it if so, but it’s night time so it’s hard to test if it worked or not.
Also I just realised one setting which is missing from my inverters Modbus settings: the String control address offset. Since I didn’t see this setting and therefore didn’t change anything related to it, by running the automation on the 40236 address, could I have accidentally changed the wrong setting (the Ramp time for moving from current setpoint to new setpoint, according to your spreadsheet?) If so is there an easy way to undo and revert this to the default setting, whatever this is?
You won’t see any changes in the web browser of the inverter when you send the modbus commands. I have setup a sensor that shows me when the inverter is in curtailment mode and will add this to the blog.
Step 3.5 has the “String control address offset” which is set at 101 (or I think of it as 1). Therefore when you run the automation the address of 40236 is actually 40237 which you will see in the spreadsheet is “Enumerated valued. Throttle enable/disable control.”
I do not think there is an easy way to reset settings to default so keep track on what is being changed.
That’s ok, now the sun is up I can see it is working. Although it’s working a bit differently than when I was changing it manually in the browser. It used to ramp down and feed the home exactly what is being used, but at the moment it looks like it’s completely shut off the solar and only my PW2 is feeding the home. I followed the guide exactly the same as your blog, and I did notice that you put 0 for the total DC output of the system. Should this be 5000 in my case or does this not matter?
Thanks for posting this btw it finally allowed me to get somewhere with modbus.
That is great, are you sure you haven’t set the 40232 register to 0%? This would reduce the output like you described.
The total DC power [Wp] of the PV system is a control reference. It is also the reference value in the case of a fallback in the case of a meter failure error.
I followed your guide afaik. This is my throttle command:
unit: 1
hub: Fronius
address: 40236
value: “0”
Is it possible I’ve changed something in the fronius webpage that could cause it? Having said all that I have noticed the solar SOMETIMES matches my home. But rarely.
Mostly what happens is it will switch over to using my powerwall and drain it to sometimes below 80%.
Ok for those who have the same issue as me, I fixed this by making the backup reserve for the powerwall 100%. You can automate this as an additional action in HA with the Tesla Custom Integration (not the default Tesla integration on HA). This one: https://github.com/alandtse/tesla
And then reset it to 20% or whatever you have it as once the FIT goes above 0c again, or when the sun sets, etc. This was the only way I was able to get my Fronius Gen24 to actually use the solar but ramp down to match the home usage during throttling.
You might want to preface all of this with the fact that it requires a modbus smart meter to be enabled.
Also if they have multiple inverters this will not work unless they are in a master/follower config.
Craig
Thanks, I’ve added a hardware & software section. Appreciated!
Hi there,
This is exactly what I’m looking to do!
Only question though… can this work with a Fronius Primo 5.0-1? (Not a Gen24)?
Cheers!
yes I have a Primo 5.0 and it is working fine.
Yes, I believe so. If you follow step 3 and verify it has the modbus feature it should be fine.
How did you create the negative sensor?
I’m fairly new to Home Assistant. I’ve been able to do the rest with the Modbus and sending commands to the inverter.
Just not triggering properly when the Amber FiT price changes from positive to negative.
It’s a great tutorial otherwise!
Thanks again!
I seem to have some progress – however I am running 2 Primo inverters in a leader / follower arrangement. When I use the Fix Fronius 100% and the Throttle commands they don’t seem to be any different from each other ie the Dynamic reduction command in the inverter for 0W to grid seems to stay applied it just changes the combination around of power from both inverters. I have set up the priorities for Control via Modbus to be first preference followed by Dynamic Power Reduction. Any tips would be much appreciated.
Hi Phil,
How did you configure the leader/follower (master/slave) etc? Ive tried with the RTU interface and TCP and it just wont work. I have 2x Primo GEN24 5.0. Logging in as Technician account but no luck.
Good point, I’ve created two additional steps.
– “Step 2 – Setup Home Assistant Amber Electric API”
– “Step 4 – Define a sensor which triggers when Amber Electric price is negative”
Let me know how you go.