
Setting up Tesla Integration with Home Assistant and CloudFlare
In the wake of Tesla discontinuing their REST-API, managing your vehicle via Home Assistant (HA) has become a tad more intricate but not impossible. You’re faced with a choice: opt for a Tessie subscription or, for the DIY enthusiasts, directly link your Tesla Integration with Home Assistant. Both paths have merits, but let’s dive into the latter for those who love a good project.
Preparation: To use the API you have to register a developer account with Tesla and (at least formally) register an app. When setting up the app, Tesla requires a web server that can be accessed from the Internet and one which certain certificates are stored.
Therefore, the software components are first installed and configured on the HA server. The server will later be made accessible on the Internet and the Tesla developer account will then be created including app registration.
Here are the steps, with the assumption that you have Home Assistant already operational and is running in Home Assistant Operating System mode.
If you are running Home Assistant on Docker follow this guide.
- Ensure your Home Assistant is accessible over the internet.
- Install Apache 2 Minimal Web Server
- Enable a Secondary Cloudflare Zero Trust tunnel
- Create a Tesla developer account
- Install Tesla HTTP Proxy configuration
- Install the Tesla Custom integration
1. Ensure Home Assistant is accessible of the internet
It is critical that the Tesla Service can access your HA instance, I’ve previously written a blog showing how to do this with Cloudflare Zero Trust. You can use other methods providing Tesla recognise the SSL certificate.
Note: If you have tightened up your security and implemented geo-blocking or equivalent you will need to remove this to ensure your website is accessible from anywhere on the internet until configured.
Alternative: If you’re looking to redirect your router’s traffic and use port forwarding to channel it to port 443 on your web server, alongside implementing DuckDNS, I recommend following the guidance provided in the Tesla Integration wiki.
2. Install Apache2 Minimal Web Server
Tesla requires access to a couple of private keys to validate your configuration. This is best hosted via a plain old Apache2 web server which is accessed through a Cloudflare Zero Trust tunnel.
2.1 Kickstarting web server installation
Start by adding the HA-Addons repository. You can do this manually with the provided GitHub repository link or simply click the ‘Add Repository’ button below for a quick setup and add the repository.
![]()
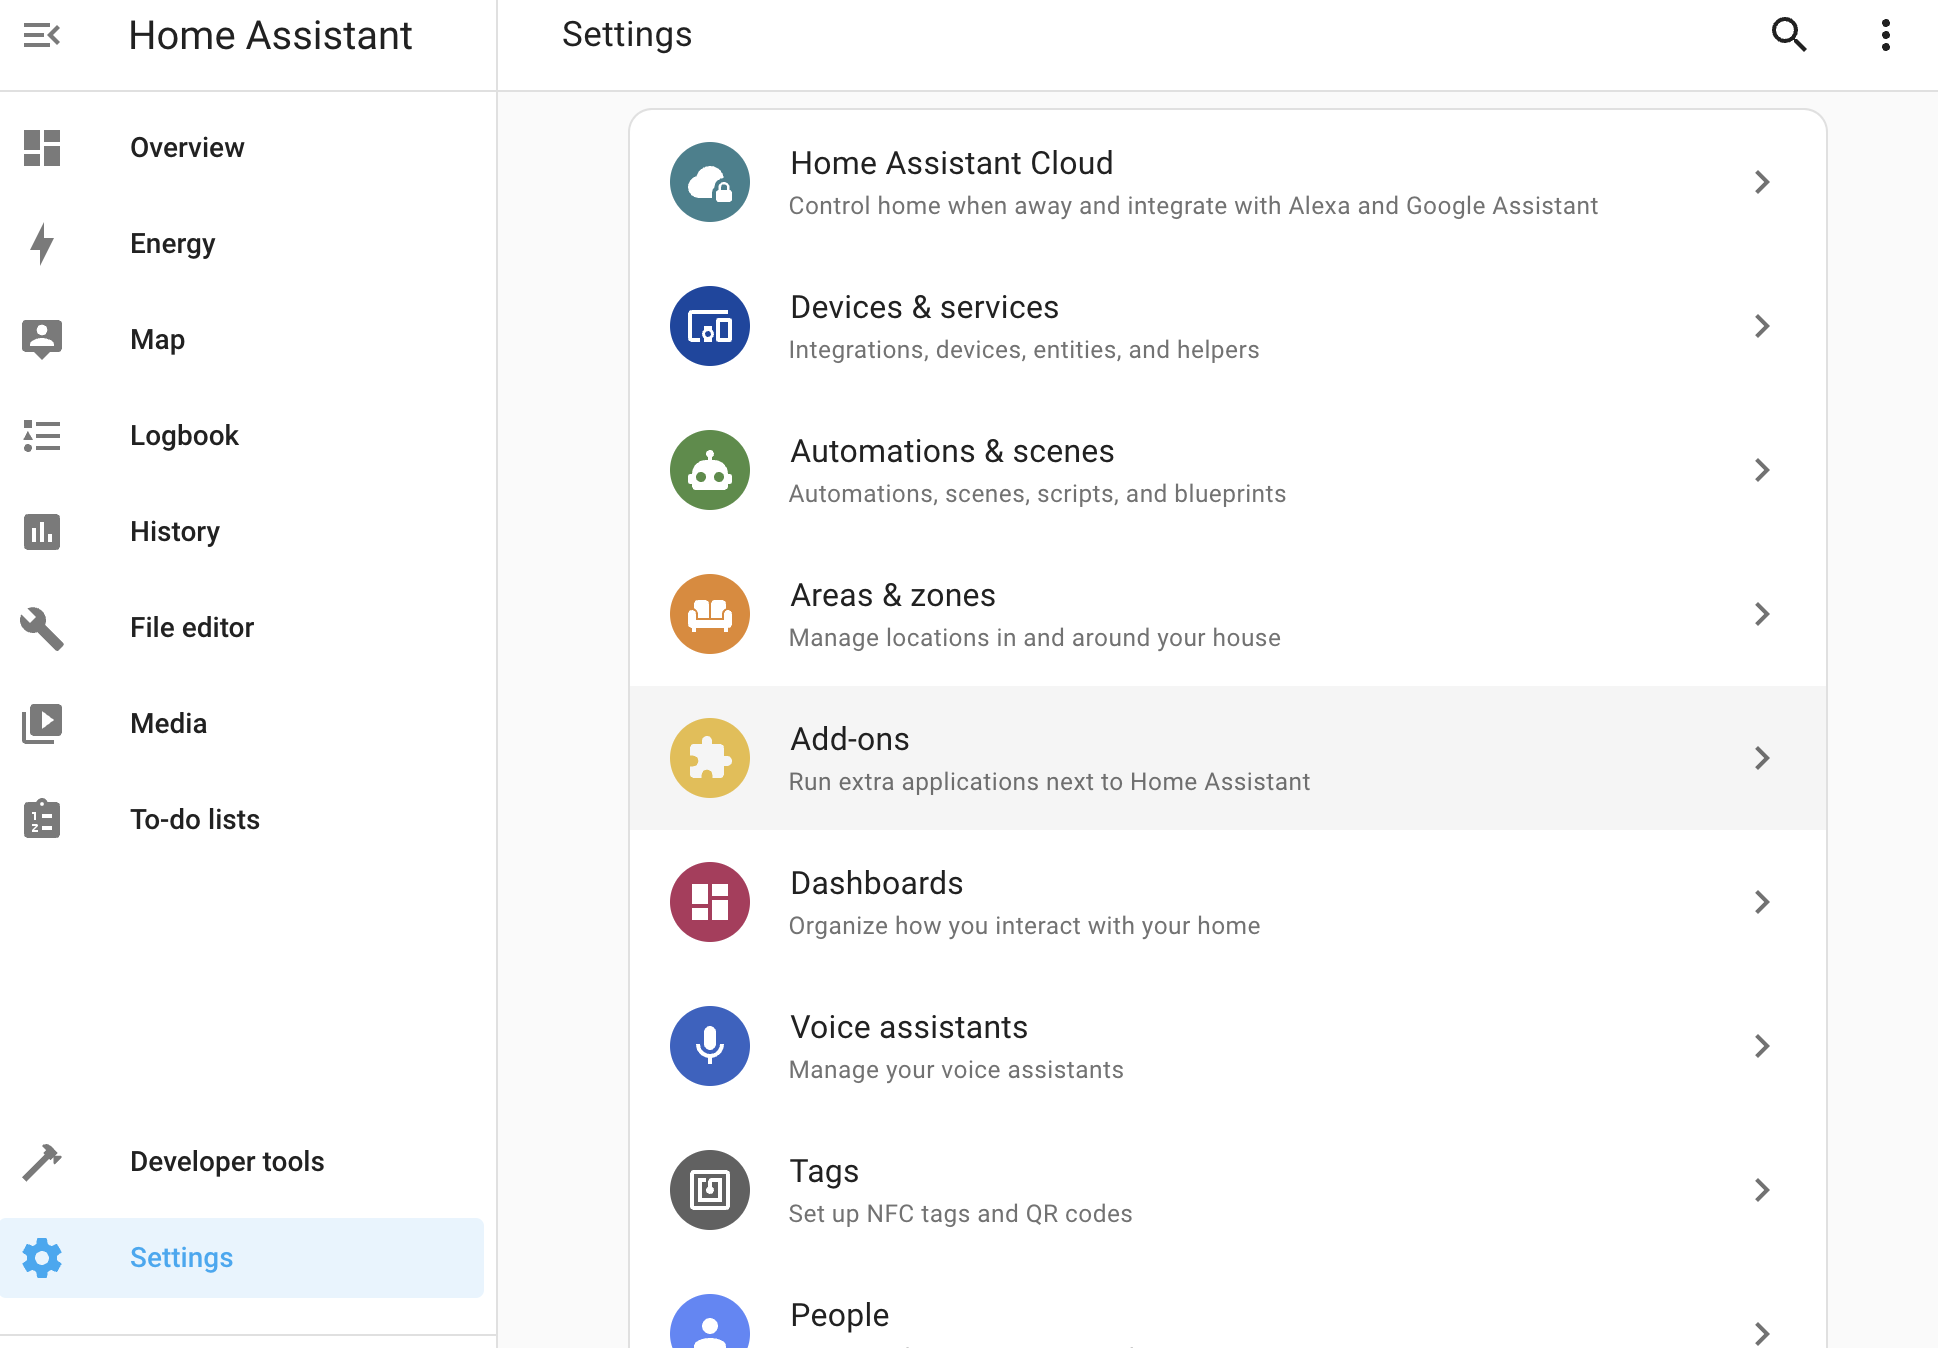
2.2 Navigating to the Add-On Store
After adding the repository, head over to your Home Assistant and go to Settings > Add-Ons, then tap on the Add-On Store and install the Apache2 Minimal Add-On.
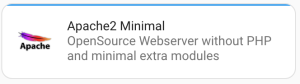
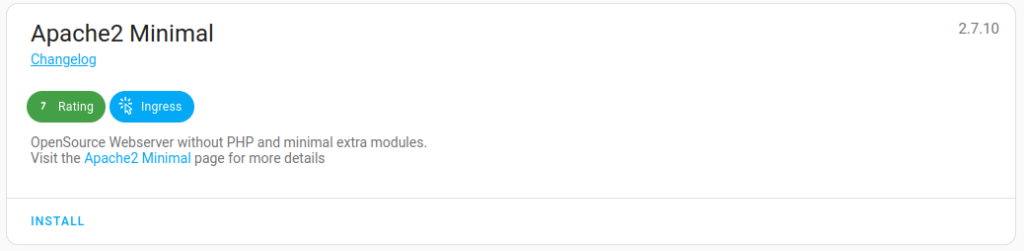
2.3 Start the Apache2 installation.
Click on the install button to download and install the Apache2 Minimal web server.
2.4 Start up options.
Enable the startup options to ensure it stays up-to-date and doesn’t crash.
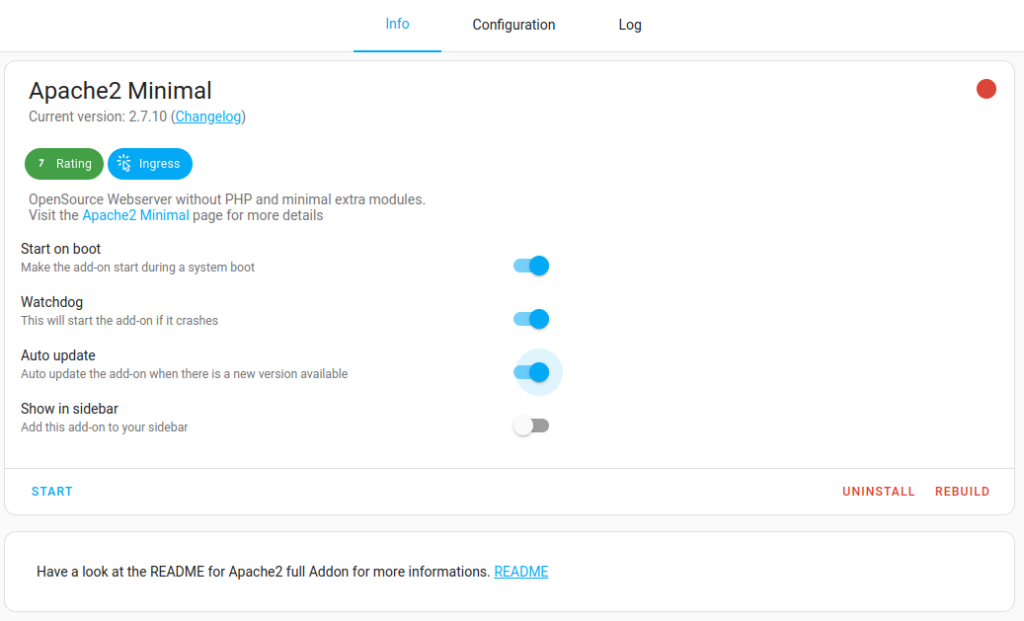
2.5 Configuration Tab
Connect to the configuration tab and fill out the details as per example below with your appropriate domain name.
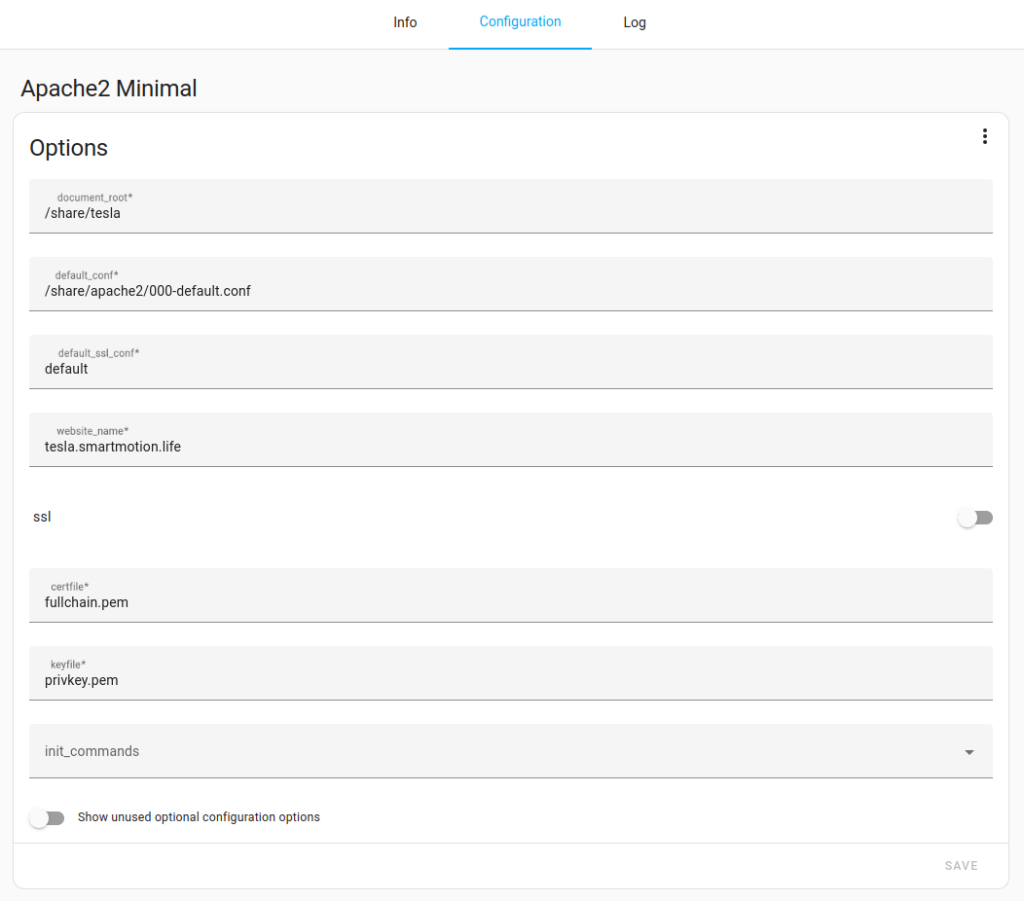
2.6 Create your apache.conf file.
Login via ssh to your Home Assistant host and create the 000-default.conf file in the /share/apache2/ directory as per below.
<VirtualHost *:80>
  ServerName tesla.smartmotion.life
  DocumentRoot /share/tesla/
  <Directory "/share/tesla">
    Require all granted
  </Directory>
  Alias "/.well-known/appspecific/" "/share/tesla/"
  <Location "/">
    Require all denied
  </Location>
  <Location "/.well-known/appspecific">
    Require all granted
  </Location>
</VirtualHost>
2.7 Start your web server

3. Enable a Secondary Zero Trust tunnel.
Step 1 showed you how you can connect to your HA instance via a Cloudflare Zero trust tunnel. This negates the need to modify your router and port forward and manages the SSL certificate for you. With this configuration you will setup a second website so you will have two URL’s pointing at the HA host. One is your HA instance, the other is the Apache server setup in step 2. This will be used to share the *pem files with Tesla to validate and authenticate the Tesla API.
3.1 Get started
Visit CloudFlare website, sign in with your account.
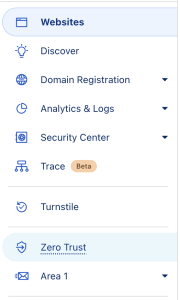
3.2 Navigate to Zero Trust tunnel
Create a zero trust tunnel, and chose Configure.


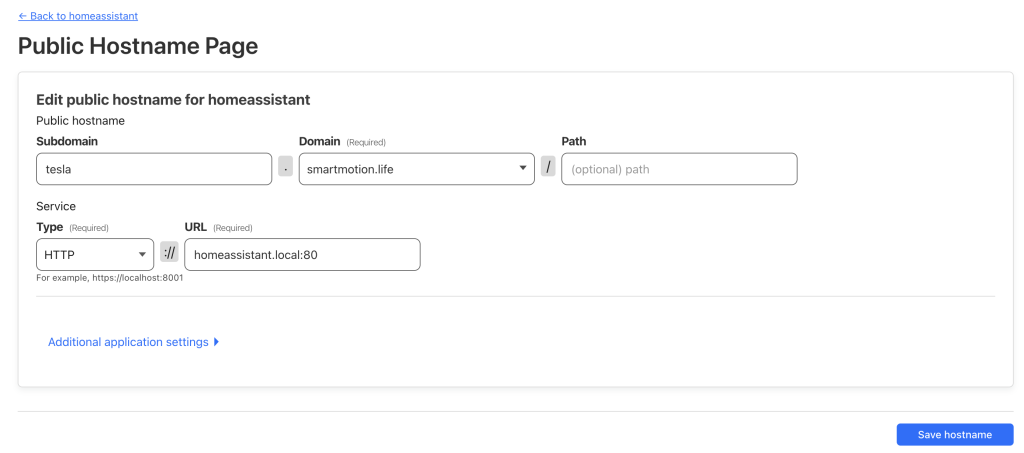
3.3 Add a public hostname
You should already have one which was defined in step 1, choose to add one for Tesla API to authenticate against.

3.4 Configuring your Tesla API public host name
When setting up your Apache2 web server, it’s essential to designate a subdomain specifically for Tesla’s API authentication. This step is crucial as it establishes a direct line of communication between Tesla’s services and your setup. Given that the Cloudflare Zero Trust tunnel provides robust encryption, you can confidently operate this connection over port 80. This choice ensures a seamless flow of traffic straight from Cloudflare’s secure endpoints to your Home Assistant (HA) host, all the while maintaining the integrity and confidentiality of your data.
During this process, your server will host *.pem files in a public directory. These files are critical for the authentication process, serving as digital certificates that verify your server’s identity to Tesla’s API. It’s important to note that while these files are accessible, they are securely managed and play a pivotal role in the authentication sequence, ensuring that only authorised requests are processed by your Tesla API application.
By carefully following these guidelines, you’ll establish a secure and efficient communication channel between your Home Assistant setup and Tesla, enabling advanced control and integration of your vehicle with your smart home ecosystem.
4. Create a Tesla developer account
4.1 Get going with your Tesla Developer account.
Go to developer.tesla.com and register as a developer with your standard Tesla account. Two-factor authentication must be set up for the account; I used Microsoft Authenticator as the app.
Tesla required an Australian Business Number (ABN). Smart Motion has a valid one, so the example used that. However, if you do not, it may be possible to create a dummy ABN. I have read that Tesla has promised to remove the ABN requirement. If this has been done, please post a message below.
Once you set up the account, create a pro forma app authorised to access the vehicle.
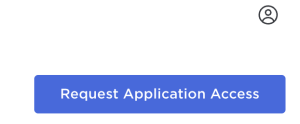
4.2 Request Application Access
Once logged into the developer dashboard choose ‘Request Application Access’.
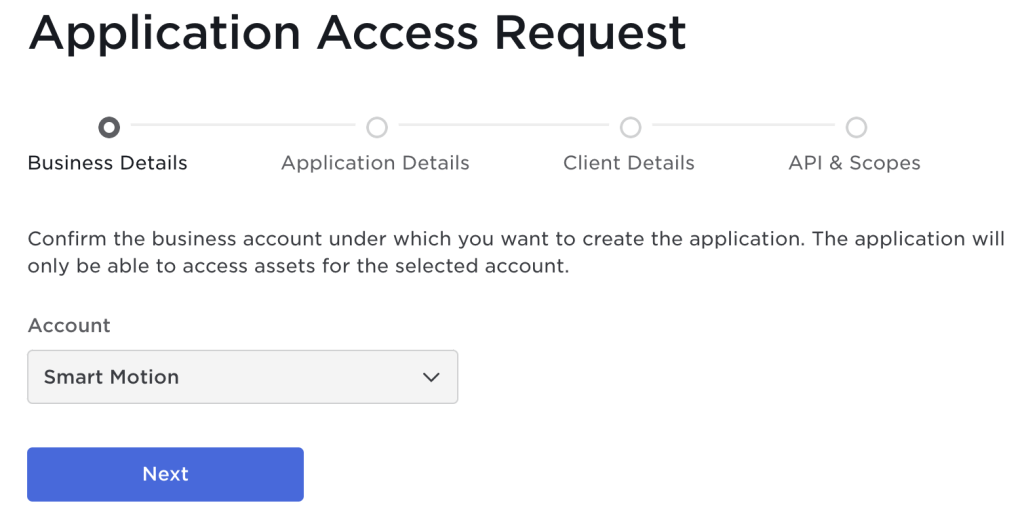
4.3 Choose the account which you have just created.
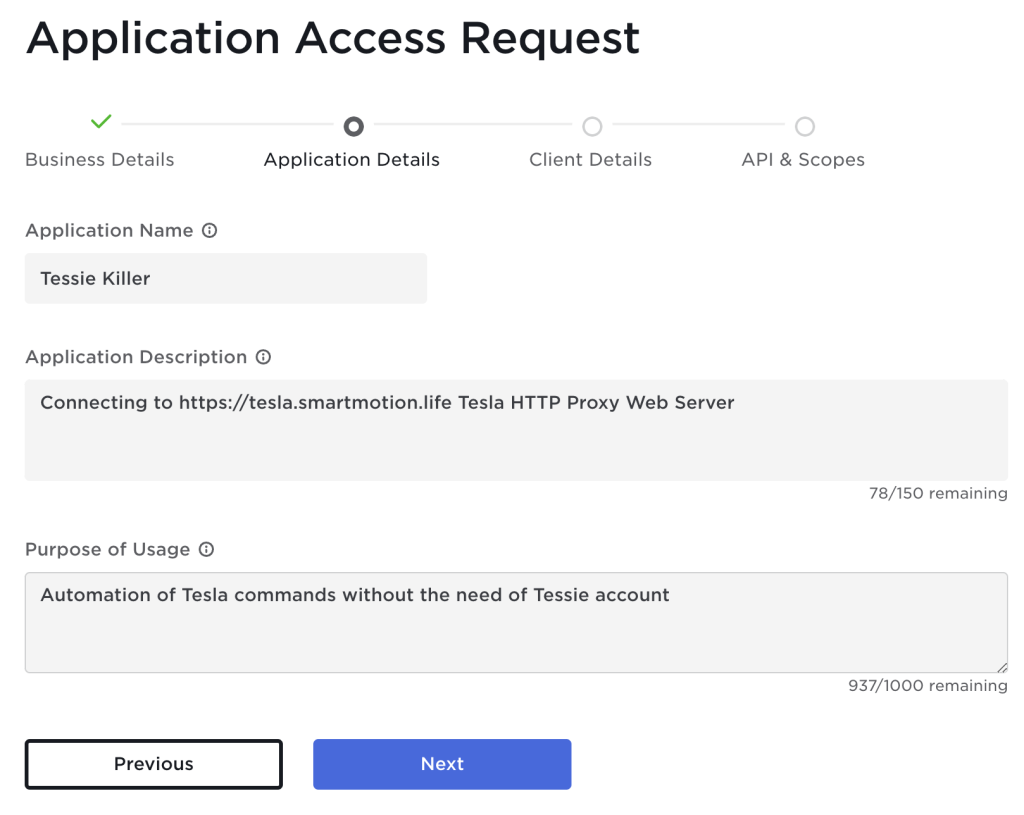
4.4 Write a short description of the purpose of this application
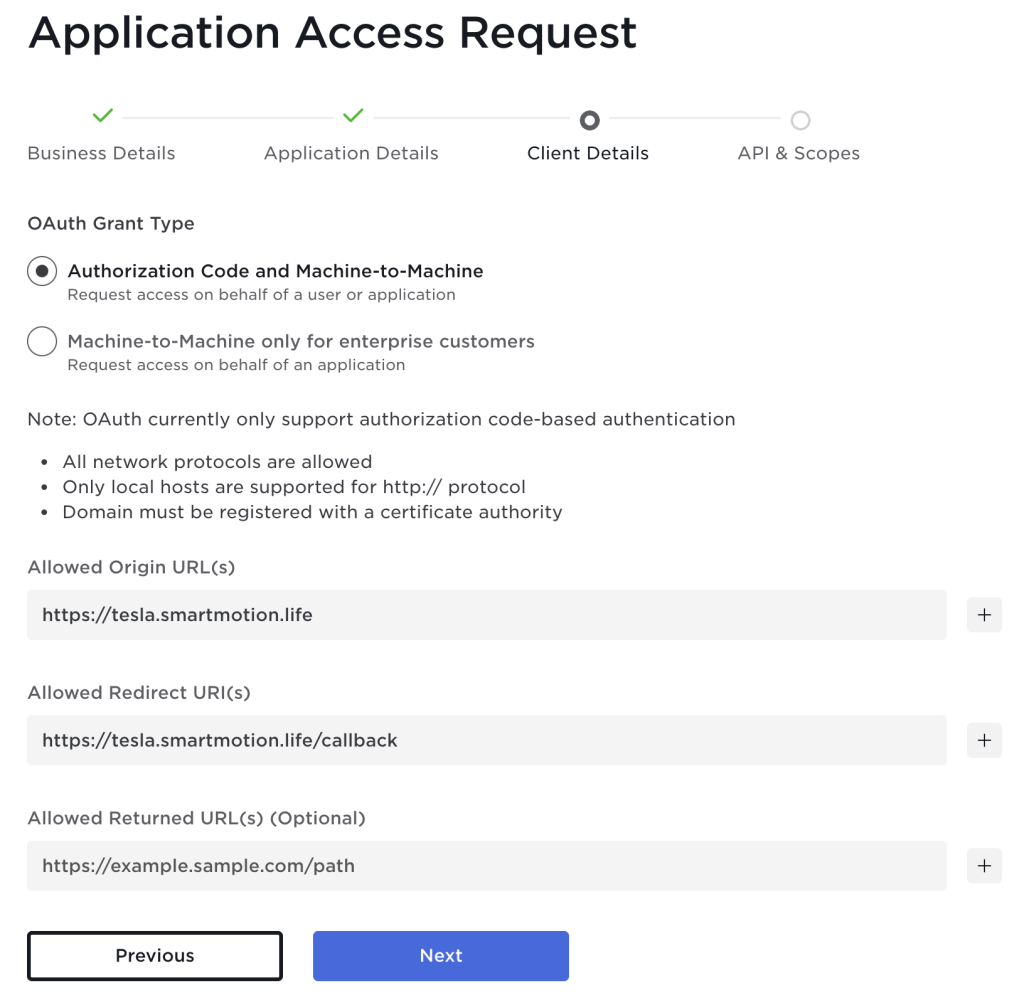
4.5 Enter the client details for your configuration
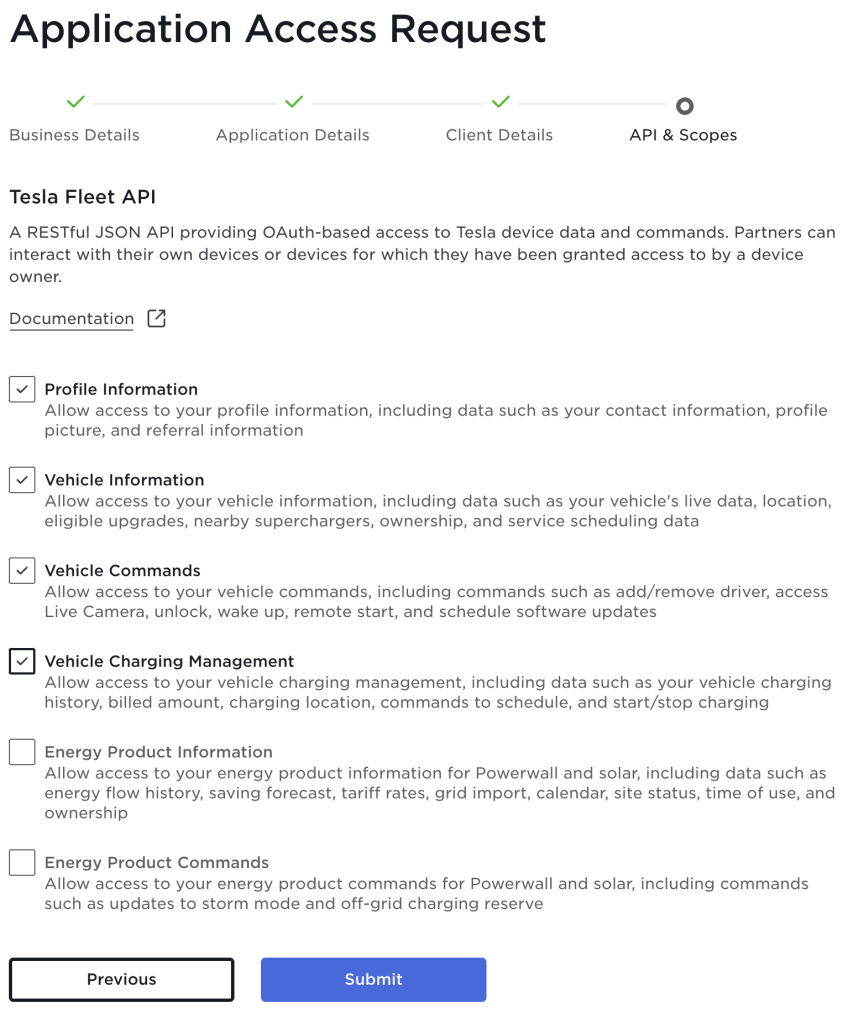
4.6 Specify the API & Scopes for what you will use it for, I am only accessing vehicle information hence my choices.
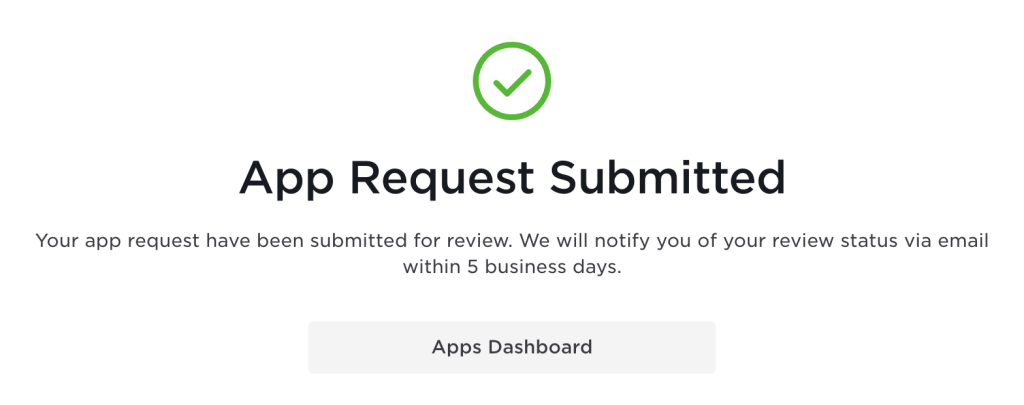
4.7 App Request Submitted
After a few seconds, Tesla will send you an automatic approval email. Important: Tesla now checks whether the domain can be reached via the Internet and whether the certificate is correct.
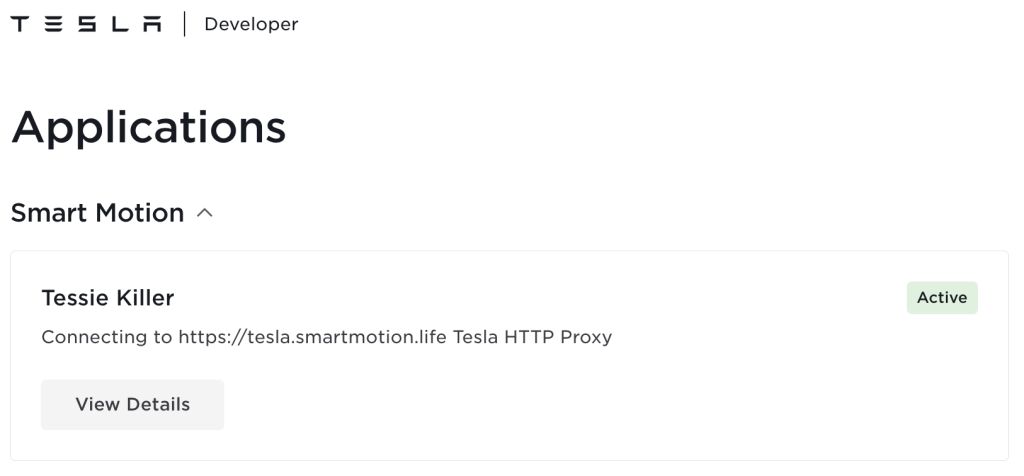
If it worked, you will see the app you created in your account.
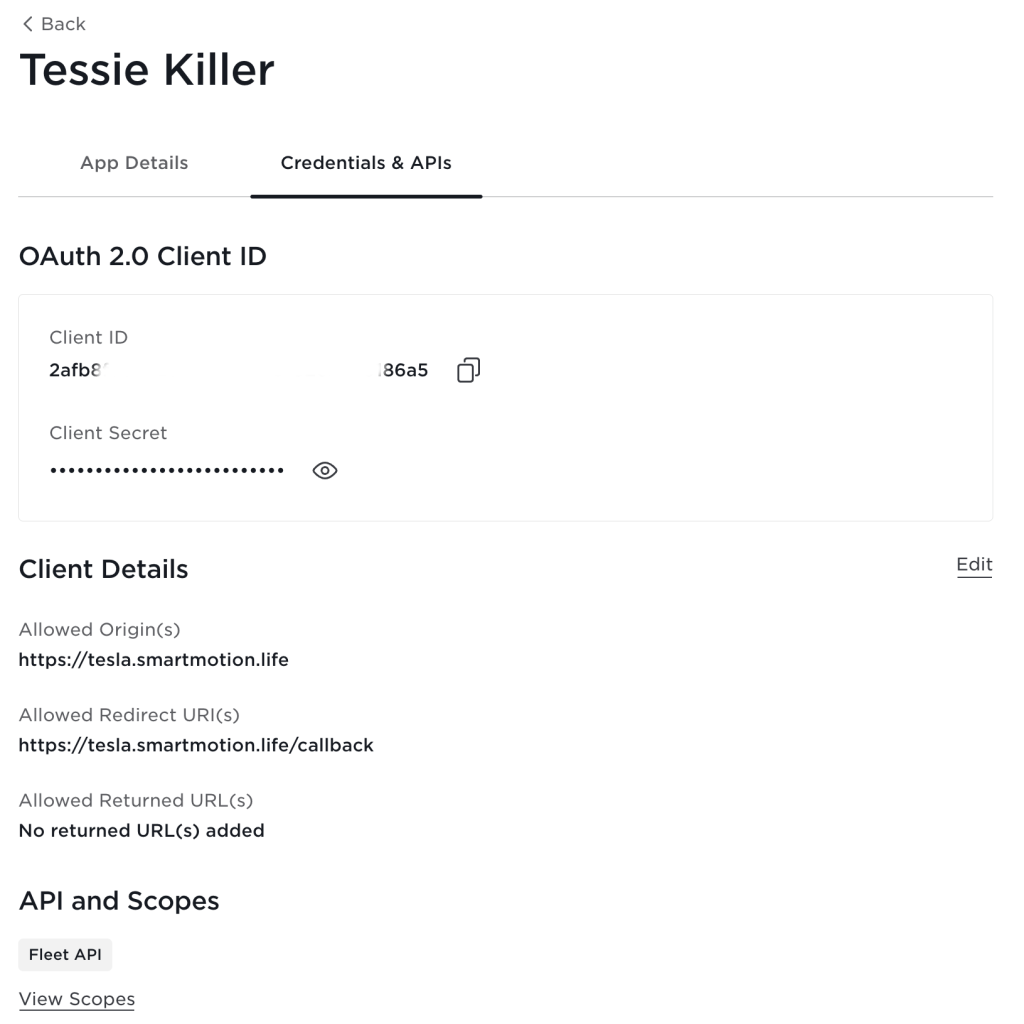
4.8 You should now see an active application within your dashboard, choose to ‘View Details’
4.9 Copy and store securely the details, you will need them in step 5.4 below.
5. Install Tesla HTTP Proxy configuration
5.1 Kickstarting Cloudflared Integration
Start by adding the HA-Addons repository. You can do this manually with the provided GitHub repository link or simply click the ‘Add Repository’ button below for a quick setup and add the repository.
5.2 Navigating to the Add-On Store
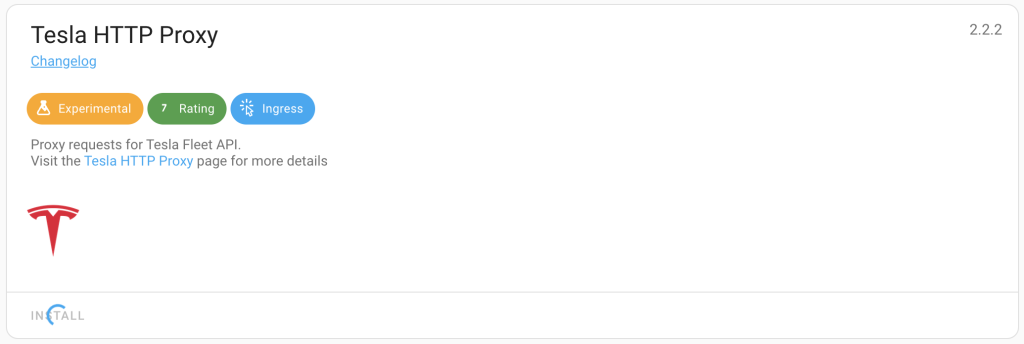
After adding the repository, head over to your Home Assistant and go to Settings > Add-Ons, then tap on the Add-On Store and install the Tesla HTTP Proxy.

5.3 Install the Tesla HTTP Proxy
Click on the install button to download and install the Tesla HTTP Proxy server.
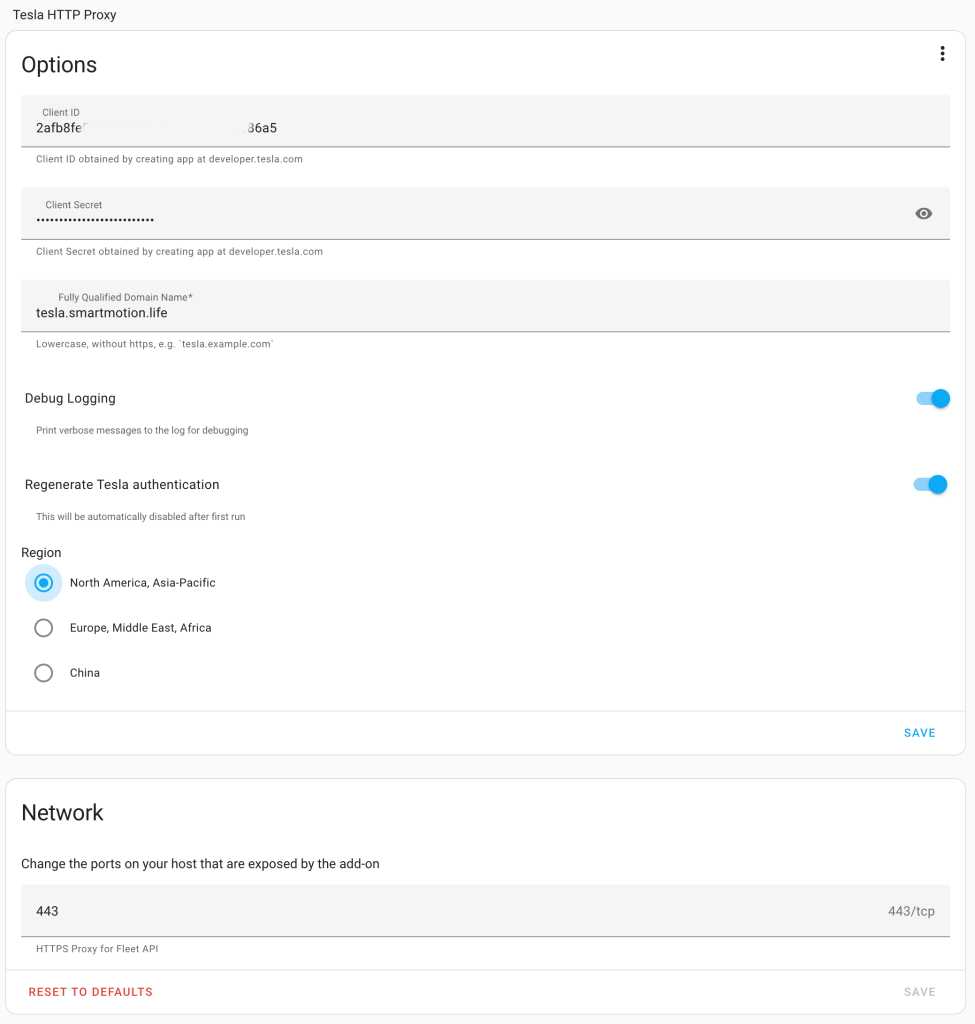
5.4 Configure the Tesla HTTP Proxy
Head over to the Configuration tab and populate the service, you will need the details from step 4.9.
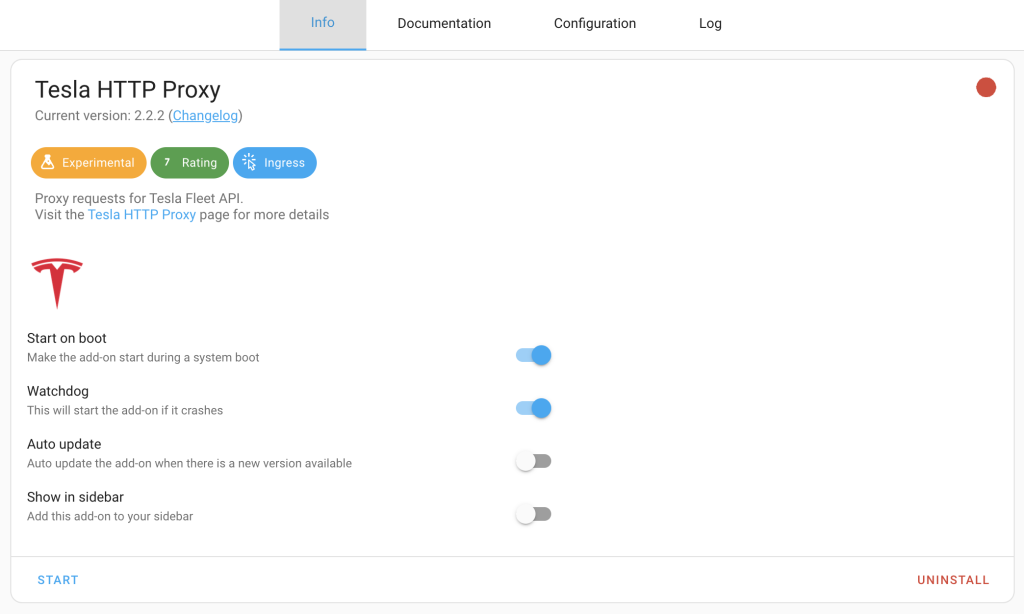
5.5 Navigate to the info tab and start the Add-On.
Note: If this did not start have you followed the DNS entry setup in 1.2?
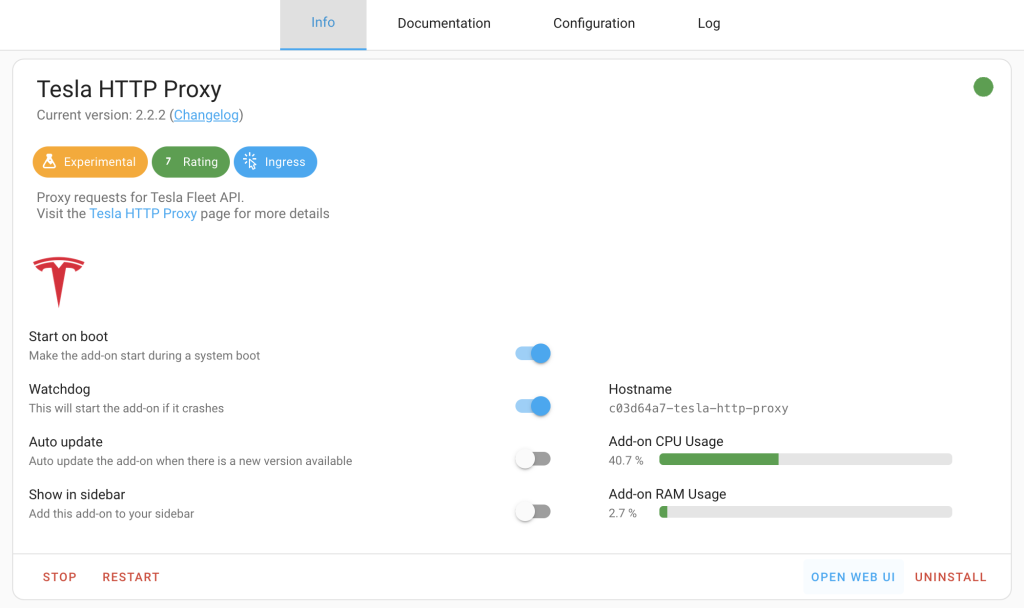
5.6 Choose Open Web UI
5.7 We will now follow the four steps in order to authenticate with your Tesla account, choose ‘Login to Tesla account’
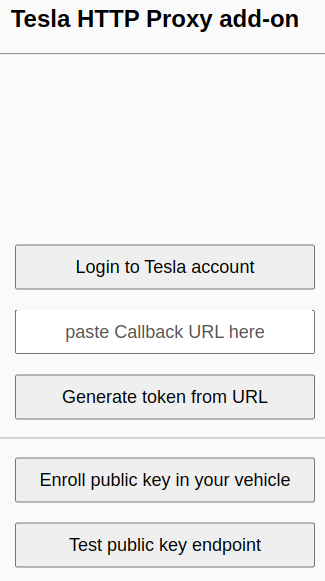
Note: You will see a call out warning you that the ‘Page not found’ is to be expected.
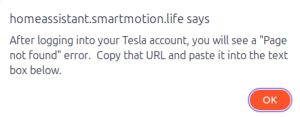
5.8 After you have logged into your Tesla account copy the URL from the address bar.
![]()
5.9 Navigate back to Home Assistant and paste this callback into the dialogue box provided and choose ‘Generate token from URL’

5.10 Click ‘OK’ at the Authorization complete screen which will copy the refresh token to your clipboard

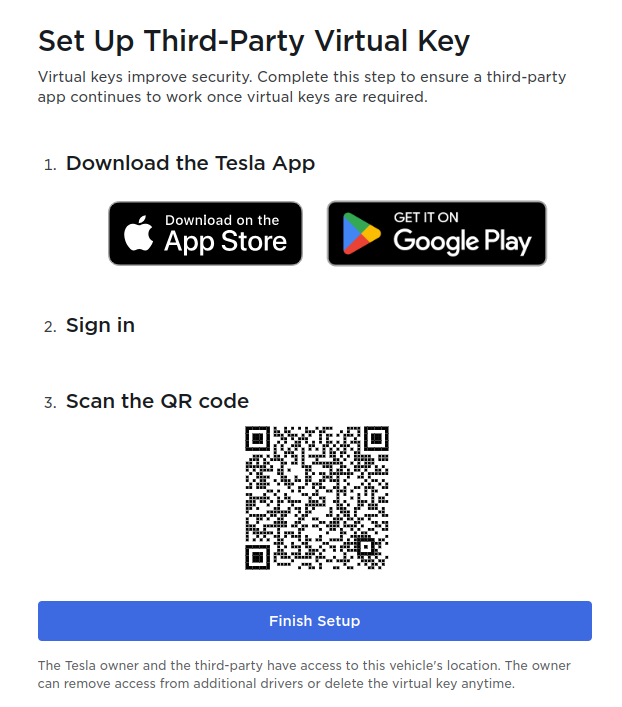
5.11 Navigate back to the Tesla HTTP Proxy add on screen and choose ‘Enrol public key in your vehicle’ and follow the instructions.
- Sign in to the Tesla App
- Scan the QR Code
- Click ‘Finish setup’ on your phone and it will install the ‘Virtual Key’ in your vehicle
6. Install the Tesla Custom Integration
6.1 Home Assistant Tesla Custom Integration installation
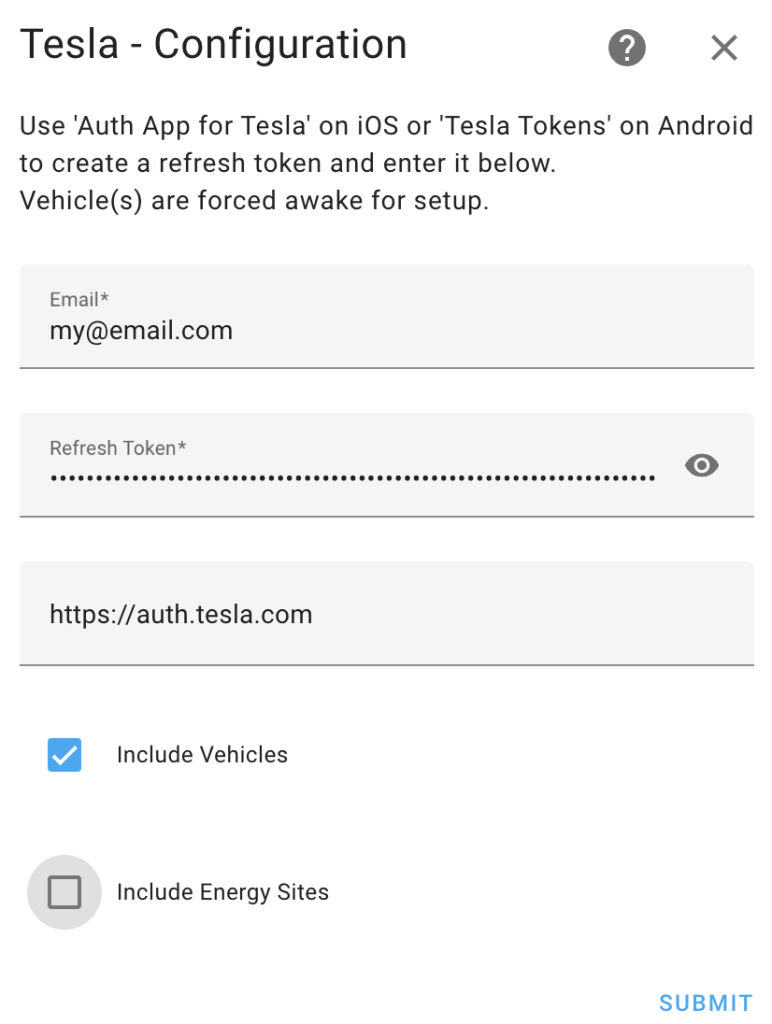
You now have a ‘Refresh Token’ that will enable the Tesla Custom Integration to authenticate. Install it from GitHub repository link or simply click the ‘Add Repository’ button below for a quick setup and add the repository.
![]()
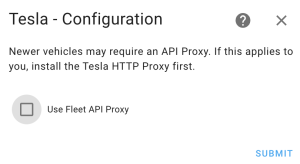
6.2 Agree that you need the Tesla HTTP Proxy, which you have already done.
Note: RG mentioned in the comments that enabling the ‘Use Fleet API Proxy’ option was necessary for their configuration.
6.3 Enter your email address and the ‘Refresh Token’ from step 5.10.
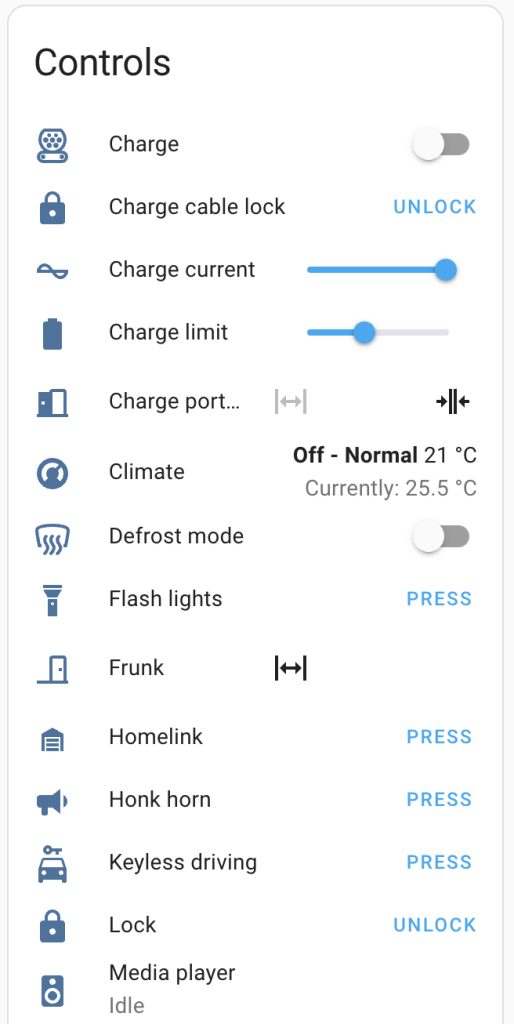
6.4 Within your integrations you will now see commands to control your Tesla.
Congratulations! You’ve now got your own Tesla Integration working without the need for ongoing subscription to Tessie! Have questions or feedback for Home Assistant with Cloudflare Zero Trust? Feel free to share your thoughts or ask for help in the comments below.
Did this guide help you secure your Home Assistant remotely? If you found it valuable and are feeling generous, consider Buying Me A Coffee. Your support encourages me to create more helpful content like this. Cheers!

I just ran though this with a little troubleshooting but was able to get it working, one thing to add, is Tesla developer site no longer allows you to use the word Tesla in the URL for the callback and origin, or at least it was giving me this error when trying to do so:
Invalid domain. Domain must be registered with a certificate authority and cannot contain “Tesla”.
I’m getting this error too now. also as of 1st Jan 2025 it seems Tesla are moving to a paid model with only a small <$10 allocation free/month. It's getting harder and harder to get this info from Tesla – despite the fact that the connection is already paid for!
Have done the steps:
1) Verified that apache is running. I set up the files per the instructions
2) Set up a second public hostname in cloudflare
3) Registered with Tesla & got the relevant info
4) Created the QR code
Get error message: Cannot share Vehicle. Adding virtual key for tesla.mywebsite.com is not allowed because tesla.mywebsite.com has not given access to your account.
Do you know what could be wrong?
What are the errors within the logs?
I can access my home assistant via the web but when I try to get to the tesla site I get the following errors in the apache2 log:
[Thu Oct 10 20:29:39.606845 2024] [authz_core:error] [pid 139:tid 139] [client 172.30.32.1:49368] AH01630: client denied by server configuration: /share/tesla/
172.30.32.1 – – [10/Oct/2024:20:29:39 +0200] “GET / HTTP/1.1” 403 284
[Thu Oct 10 20:29:39.682951 2024] [authz_core:error] [pid 139:tid 139] [client 172.30.32.1:49368] AH01630: client denied by server configuration: /share/tesla/hacsfiles, referer: https://tesla.mysite.nl/
172.30.32.1 – – [10/Oct/2024:20:29:39 +0200] “GET /hacsfiles/iconset.js HTTP/1.1” 403 284
[Thu Oct 10 20:29:39.694523 2024] [authz_core:error] [pid 139:tid 139] [client 172.30.32.1:49368] AH01630: client denied by server configuration: /share/tesla/auth, referer: https://tesla.mysite.nl/
172.30.32.1 – – [10/Oct/2024:20:29:39 +0200] “GET /auth/authorize?response_type=code&redirect_uri=https%3A%2F%2Ftesla.mysite.nl%2F%3Fauth_callback%3D1&client_id=https%3A%2F%2Ftesla.mysite.nl%2F&state=eyJoYXN…………5sLyJ9 HTTP/1.1” 403 284
[Thu Oct 10 20:29:39.709798 2024] [authz_core:error] [pid 139:tid 139] [client 172.30.32.1:49368] AH01630: client denied by server configuration: /share/tesla/manifest.json, referer: https://tesla.mysite.nl/lovelace
172.30.32.1 – – [10/Oct/2024:20:29:39 +0200] “GET /manifest.json HTTP/1.1” 403 284
[Thu Oct 10 20:29:39.796703 2024] [authz_core:error] [pid 139:tid 139] [client 172.30.32.1:49368] AH01630: client denied by server configuration: /share/tesla/favicon.ico, referer: https://tesla.mysite.nl/auth/authorize?response_type=code&redirect_uri=https%3A%2F%2Ftesla.mysite.nl%2F%3Fauth_callback%3D1&client_id=https%3A%2F%2Ftesla.mysite.nl%2F&state=eyJoYX…………m5sLyJ9
172.30.32.1 – – [10/Oct/2024:20:29:39 +0200] “GET /favicon.ico HTTP/1.1” 403 284
When I type: ttps://tesla.site.nl/.well-known/appspecific/com.tesla.3p.public-key.pem
I get the answer (with the actual key of course):
—–BEGIN PUBLIC KEY—–
MFkwEw……….removed most of the key…………..fOEKw==
—–END PUBLIC KEY—–
Were you able to sort this out? I´m in the same situation, I have triple checked everything, but I keep running into the “Cannot share vehicle” error.
Had tried it also one-time sitting in the car. Will try that again this weekend and let you know.
No have not tried anymore. Had also triple or more checked all the configuration steps. Cannot find the issue.
How physically close are you to the vehicle? It may need to share via bluetooth.
Thanks for a great guide TUX43, I’ve managed to follow the process and get everything working too. A slight hiccup at the last step 5.11 which would not authorize as I had set up the port wrongly at step 3.4 to “8123” rather than the required “80”
Error “unable to share vehicle. This third party isn’t registered with Tesla. We can’t grant them access at this time.””
Also having issues with registering the vehicle at the end. I can read the PEM just fine remotely and get back code 200, no errors on any logs in Apache, Cloudfare nor Tesla Proxy. Just get stuck at the end. I’ve cranked the Cloudfare security to ‘essentially zero’.
Is there any enhanced debugging to see the responses from Tesla as to why it thinks it may not be registered?
-I can access the HA instance remotely
-I can access the PEM remotely OK using the FQDN. The domain is managed by cloudfare
-I don’t see any errors in the logs
-I’ve triple checked all the configs of Apache2, Cloudfare and Tesla Proxy.
-I’m using HA OS on a Pi
-I’ve tried wiping the local SSL keys and restarting
-I’ve made the changes in the main configuration.yaml for the http: section
Here are extracts from the logs
Apache
`No username and/or password was provided. Skipping account set up.
SSL is deactivated and/or you are using a custom config.
Your custom apache config at /share/apache2/000-default.conf will be used.
Here is your web file architecture.
total 8
-rw-r–r– 1 root root 178 Sep 9 15:30 com.tesla.3p.public-key.pem
-rw-r–r– 1 root root 851 Sep 9 15:30 selfsigned.pem
Starting Apache2…
[Mon Sep 09 17:59:01.771832 2024] [mpm_prefork:notice] [pid 79:tid 79] AH00163: Apache/2.4.62 (Unix) OpenSSL/3.3.2 mod_wsgi/5.0.0 Python/3.12 configured — resuming normal operations
[Mon Sep 09 17:59:01.771922 2024] [core:notice] [pid 79:tid 79] AH00094: Command line: ‘/usr/sbin/httpd -D FOREGROUND’
172.30.32.1 – – [09/Sep/2024:18:09:23 +0100] “GET /.well-known/appspecific/com.tesla.3p.public-key.pem HTTP/1.1” 200 178
[Mon Sep 09 18:13:21.234655 2024] [authz_core:error] [pid 140:tid 140] [client 172.30.32.1:36488] AH01630: client denied by server configuration: /share/tesla/callback
172.30.32.1 – – [09/Sep/2024:18:13:21 +0100] “GET /callback?code=xxxxxxxxxxx&state=xxxxxxx&issuer=https%3A%2F%2Fauth.tesla.com%2Foauth2%2Fv3 HTTP/1.1” 403 282
[Mon Sep 09 18:13:21.405496 2024] [authz_core:error] [pid 140:tid 140] [client 172.30.32.1:36488] AH01630: client denied by server configuration: /share/tesla/apple-touch-icon-precomposed.png
172.30.32.1 – – [09/Sep/2024:18:13:21 +0100] “GET /apple-touch-icon-precomposed.png HTTP/1.1” 403 282
[Mon Sep 09 18:13:21.604356 2024] [authz_core:error] [pid 140:tid 140] [client 172.30.32.1:36488] AH01630: client denied by server configuration: /share/tesla/apple-touch-icon.png
172.30.32.1 – – [09/Sep/2024:18:13:21 +0100] “GET /apple-touch-icon.png HTTP/1.1” 403 282
172.30.32.1 – – [09/Sep/2024:18:15:24 +0100] “GET /.well-known/appspecific/com.tesla.3p.public-key.pem HTTP/1.1” 200 178
172.30.32.1 – – [09/Sep/2024:18:20:03 +0100] “GET /.well-known/appspecific/com.tesla.3p.public-key.pem HTTP/1.1” 200 178
172.30.32.1 – – [09/Sep/2024:18:38:27 +0100] “GET /.well-known/appspecific/com.tesla.3p.public-key.pem HTTP/1.1″ 200 178′
I’ve cleared various secure information with xx or used a fake domain (tesla.domain.com) in the logs.
Here is the latest Cloudfare logs
[18:38:07] INFO: Using Cloudflare Remote Management Tunnel [18:38:07] INFO: All add-on configuration options except tunnel_token will be ignored. [18:38:07] INFO: Connecting Cloudflare Tunnel… 2024-09-09T17:38:07Z INF Starting tunnel tunnelID=xxxxxxxxxxx 2024-09-09T17:38:07Z INF Version 2024.8.3 2024-09-09T17:38:07Z INF GOOS: linux, GOVersion: go1.22.2, GoArch: arm64 2024-09-09T17:38:07Z INF Settings: map[metrics:0.0.0.0:36500 no-autoupdate:true token:*****] 2024-09-09T17:38:07Z INF Generated Connector ID: xxxxxxxxx 2024-09-09T17:38:07Z INF Initial protocol quic 2024-09-09T17:38:07Z INF ICMP proxy will use 172.30.33.2 as source for IPv4 2024-09-09T17:38:07Z INF ICMP proxy will use ::1 in zone lo as source for IPv6 2024-09-09T17:38:07Z INF Starting metrics server on [::]:36500/metrics 2024-09-09T17:38:08Z INF Registered tunnel connection connIndex=0 connection=xxxxxx event=0 ip=xxx location=lhr10 protocol=quic 2024-09-09T17:38:08Z INF Registered tunnel connection connIndex=1 connection=xxxxxxx event=0 ip=xxxx location=lhr13 protocol=quic 2024-09-09T17:38:09Z INF Registered tunnel connection connIndex=2 connection=xxxxxxx event=0 ip=xxxxx location=lhr10 protocol=quic 2024-09-09T17:38:09Z INF Updated to new configuration config=”{\”ingress\”:[{\”hostname\”:\”ha.domain.com\”,\”originRequest\”:{},\”service\”:\”http://homeassistant.local:8123\”},{\”hostname\”:\”tesla.domain.com\”,\”originRequest\”:{},\”service\”:\”http://homeassistant.local:80\”},{\”service\”:\”http_status:404\”}],\”warp-routing\”:{\”enabled\”:false}}” version=4 2024-09-09T17:38:10Z INF Registered tunnel connection connIndex=3 connection=xxxxxxx event=0 ip=198.41.200.53 location=lhr01 protocol=quic
Here are the latest Tesla Proxy logs
`[18:38:26] werkzeug:INFO: Press CTRL+C to quit
[18:38:27] INFO: Found existing keypair
[18:38:27] INFO: Testing public key…
HTTP/2 200
date: Mon, 09 Sep 2024 17:38:27 GMT
content-length: 178
accept-ranges: bytes
etag: “xxxxxx”
last-modified: Mon, 09 Sep 2024 14:30:34 GMT
cf-cache-status: DYNAMIC
report-to: {“endpoints”:[{“url”:”https://a.nel.cloudflare.com/report/v4?s=xxxxxxxxx”}],”group”:”cf-nel”,”max_age”:604800}
nel: {“success_fraction”:0,”report_to”:”cf-nel”,”max_age”:604800}
server: cloudflare
cf-ray: xxxxxx
alt-svc: h3=”:443″; ma=86400
—–BEGIN PUBLIC KEY—–
Key was here==
—–END PUBLIC KEY—–
[18:38:27] INFO: Starting Tesla HTTP Proxy
Do not listen on a network interface without adding client authentication. Unauthorized clients may
be used to create excessive traffic from your IP address to Tesla’s servers, which Tesla may respond
to by rate limiting or blocking your connections.
2024-09-09T18:38:28+01:00 [debug] Creating proxy
2024-09-09T18:38:28+01:00 [info ] Listening on 0.0.0.0:443
[18:40:26] werkzeug:INFO: 172.30.32.2 – – [09/Sep/2024 18:40:26] “GET / HTTP/1.1” 200 –
[18:41:53] werkzeug:INFO: 172.30.32.2 – – [09/Sep/2024 18:41:53] “GET / HTTP/1.1” 200 –
‘
Did you solve this? How far were you away from your car? I am actually wondering if it needs to connect to the vehicle through bluetooth. Can you get closer to confirm?
I think it’s the Apache errors I’m seeing with ‘client denied’. but stumped as to what that is. The config is a mirror for yours.
Error “unable to share vehicle. This third party isn’t registered with Tesla. We can’t grant them access at this time.””
Also having issues with registering the vehicle at the end. I can read the PEM just fine remotely and get back code 200, no errors on any logs in Apache, Cloudfare nor Tesla Proxy. Just get stuck at the end. I’ve cranked the Cloudfare security to ‘essentially zero’.
Is there any enhanced debugging to see the responses from Tesla as to why it thinks it may not be registered?
-I can access the HA instance remotely
-I can access the PEM remotely OK using the FQDN. The domain is managed by cloudfare
-I don’t see any errors in the logs
-I’ve triple checked all the configs of Apache2, Cloudfare and Tesla Proxy.
-I’m using HA OS on a Pi
-I’ve tried wiping the local SSL keys and restarting
-I’ve made the changes in the main configuration.yaml for the http: section
Here are extracts from the logs
Apache
`No username and/or password was provided. Skipping account set up.
SSL is deactivated and/or you are using a custom config.
Your custom apache config at /share/apache2/000-default.conf will be used.
Here is your web file architecture.
total 8
-rw-r–r– 1 root root 178 Sep 9 15:30 com.tesla.3p.public-key.pem
-rw-r–r– 1 root root 851 Sep 9 15:30 selfsigned.pem
Starting Apache2…
[Mon Sep 09 17:59:01.771832 2024] [mpm_prefork:notice] [pid 79:tid 79] AH00163: Apache/2.4.62 (Unix) OpenSSL/3.3.2 mod_wsgi/5.0.0 Python/3.12 configured — resuming normal operations
[Mon Sep 09 17:59:01.771922 2024] [core:notice] [pid 79:tid 79] AH00094: Command line: ‘/usr/sbin/httpd -D FOREGROUND’
172.30.32.1 – – [09/Sep/2024:18:09:23 +0100] “GET /.well-known/appspecific/com.tesla.3p.public-key.pem HTTP/1.1” 200 178
[Mon Sep 09 18:13:21.234655 2024] [authz_core:error] [pid 140:tid 140] [client 172.30.32.1:36488] AH01630: client denied by server configuration: /share/tesla/callback
172.30.32.1 – – [09/Sep/2024:18:13:21 +0100] “GET /callback?code=xxxxxxxxxxx&state=xxxxxxx&issuer=https%3A%2F%2Fauth.tesla.com%2Foauth2%2Fv3 HTTP/1.1” 403 282
[Mon Sep 09 18:13:21.405496 2024] [authz_core:error] [pid 140:tid 140] [client 172.30.32.1:36488] AH01630: client denied by server configuration: /share/tesla/apple-touch-icon-precomposed.png
172.30.32.1 – – [09/Sep/2024:18:13:21 +0100] “GET /apple-touch-icon-precomposed.png HTTP/1.1” 403 282
[Mon Sep 09 18:13:21.604356 2024] [authz_core:error] [pid 140:tid 140] [client 172.30.32.1:36488] AH01630: client denied by server configuration: /share/tesla/apple-touch-icon.png
172.30.32.1 – – [09/Sep/2024:18:13:21 +0100] “GET /apple-touch-icon.png HTTP/1.1” 403 282
172.30.32.1 – – [09/Sep/2024:18:15:24 +0100] “GET /.well-known/appspecific/com.tesla.3p.public-key.pem HTTP/1.1” 200 178
172.30.32.1 – – [09/Sep/2024:18:20:03 +0100] “GET /.well-known/appspecific/com.tesla.3p.public-key.pem HTTP/1.1” 200 178
172.30.32.1 – – [09/Sep/2024:18:38:27 +0100] “GET /.well-known/appspecific/com.tesla.3p.public-key.pem HTTP/1.1″ 200 178′
I’ve cleared various secure information with xx or used a fake domain (tesla.domain.com) in the logs.
Here is the latest Cloudfare logs
[18:38:07] INFO: Using Cloudflare Remote Management Tunnel [18:38:07] INFO: All add-on configuration options except tunnel_token will be ignored. [18:38:07] INFO: Connecting Cloudflare Tunnel… 2024-09-09T17:38:07Z INF Starting tunnel tunnelID=xxxxxxxxxxx 2024-09-09T17:38:07Z INF Version 2024.8.3 2024-09-09T17:38:07Z INF GOOS: linux, GOVersion: go1.22.2, GoArch: arm64 2024-09-09T17:38:07Z INF Settings: map[metrics:0.0.0.0:36500 no-autoupdate:true token:*****] 2024-09-09T17:38:07Z INF Generated Connector ID: xxxxxxxxx 2024-09-09T17:38:07Z INF Initial protocol quic 2024-09-09T17:38:07Z INF ICMP proxy will use 172.30.33.2 as source for IPv4 2024-09-09T17:38:07Z INF ICMP proxy will use ::1 in zone lo as source for IPv6 2024-09-09T17:38:07Z INF Starting metrics server on [::]:36500/metrics 2024-09-09T17:38:08Z INF Registered tunnel connection connIndex=0 connection=xxxxxx event=0 ip=xxx location=lhr10 protocol=quic 2024-09-09T17:38:08Z INF Registered tunnel connection connIndex=1 connection=xxxxxxx event=0 ip=xxxx location=lhr13 protocol=quic 2024-09-09T17:38:09Z INF Registered tunnel connection connIndex=2 connection=xxxxxxx event=0 ip=xxxxx location=lhr10 protocol=quic 2024-09-09T17:38:09Z INF Updated to new configuration config=”{\”ingress\”:[{\”hostname\”:\”ha.domain.com\”,\”originRequest\”:{},\”service\”:\”http://homeassistant.local:8123\”},{\”hostname\”:\”tesla.domain.com\”,\”originRequest\”:{},\”service\”:\”http://homeassistant.local:80\”},{\”service\”:\”http_status:404\”}],\”warp-routing\”:{\”enabled\”:false}}” version=4 2024-09-09T17:38:10Z INF Registered tunnel connection connIndex=3 connection=xxxxxxx event=0 ip=198.41.200.53 location=lhr01 protocol=quic
Here are the latest Tesla Proxy logs
`[18:38:26] werkzeug:INFO: Press CTRL+C to quit
[18:38:27] INFO: Found existing keypair
[18:38:27] INFO: Testing public key…
HTTP/2 200
date: Mon, 09 Sep 2024 17:38:27 GMT
content-length: 178
accept-ranges: bytes
etag: “xxxxxx”
last-modified: Mon, 09 Sep 2024 14:30:34 GMT
cf-cache-status: DYNAMIC
report-to: {“endpoints”:[{“url”:”https://a.nel.cloudflare.com/report/v4?s=xxxxxxxxx”}],”group”:”cf-nel”,”max_age”:604800}
nel: {“success_fraction”:0,”report_to”:”cf-nel”,”max_age”:604800}
server: cloudflare
cf-ray: xxxxxx
alt-svc: h3=”:443″; ma=86400
—–BEGIN PUBLIC KEY—–
Key was here==
—–END PUBLIC KEY—–
[18:38:27] INFO: Starting Tesla HTTP Proxy
Do not listen on a network interface without adding client authentication. Unauthorized clients may
be used to create excessive traffic from your IP address to Tesla’s servers, which Tesla may respond
to by rate limiting or blocking your connections.
2024-09-09T18:38:28+01:00 [debug] Creating proxy
2024-09-09T18:38:28+01:00 [info ] Listening on 0.0.0.0:443
[18:40:26] werkzeug:INFO: 172.30.32.2 – – [09/Sep/2024 18:40:26] “GET / HTTP/1.1” 200 –
[18:41:53] werkzeug:INFO: 172.30.32.2 – – [09/Sep/2024 18:41:53] “GET / HTTP/1.1” 200 –
‘
Everything worked up until enabling the integration, I get
[custom_components.tesla_custom] Unable to communicate with Tesla API: UNKNOWN_ERROR_403
When I go to https://my.site.net it shows forbidden, but when I go to https://my.site.net/.well-known/appspecific/com.tesla.3p.public-key.pem
It shows the correct key, tried to redo every step and for the life of me can’t get it to work
since the 2024.08 tesla custom integration update i have the problem that my tesla sensors are not updating anymore. i still can send commands it’s just not reading data from the car… it now states: data last update time; 54 years ago. i followed the steps from this tutorial exactly and last month everything was working.
How often are you sending commands. Are you using it to dynamically set charging current? If so, there is a restriction to the number of calls per day.
So most issues were because the pem files were not accessible via the webserver. It turns out the conf file in this tutorial is wrong. Once I’ve update the conf file everything started working as expected:
“`
ServerName tesla.yourdomain.com <– change this to your domain
DocumentRoot /share/tesla/
Require all granted
Alias “/.well-known/appspecific/” “/share/tesla/”
Require all granted
Require all granted
“`
Also, you don’t need to create another tunnel in cloudflare. You should already have your domain attached to your HA via the Cloudflared addon so you can configure Additional Hosts like this:
– hostname: tesla.yourdomain.com
service: http://homeassistant.local:80
Happy Coding!
Thanks for your post. Could you please share your complete configuration file? It’s a bit unclear what permissions have been granted based on the information above. From what I can tell, it seems like the root (/) of the web server might be exposed to the world—is that the case? This shouldn’t be necessary, as the Tesla API typically only needs access to the /.well-known/appspecific/ location.
Thanks for this guide! Worked like charm once I set port 80 to my Tesla domain – duuh. 🙂 No need to access HAOS so I removed that domain. This feels secure since the only thing shown when entering the domain for Tesla is “Unable to fetch auth providers.”
Greetings from Sweden!
Hi! i cant register my https://tesla.xxxxxx.xyz/ https://tesla.xxxxxx.xyz/callback in my Tesla account: “Invalid domain. Domain must be registererd with a certificate authority
I tested https://tesla.xxxxxx.xyz/.well-known/appspecific/com.tesla.3p.public-key.pem
my key is accessible. the certificat works too.
so it should work?
Hello, have you managed to fix that?
I have the same issue with my .dev domain
Is DNS setup to use CloudFlare as per https://www.smartmotion.life/2024/04/01/home-assistant-cloudflare-zero-trust/
Thanks for the tutorial! After generating the Tesla key, do I need to keep access open to the tesla.mydomain.com? I.e. cloudfare channel open / Apache server running?
Thanks
Yes you do, Tesla authenticates every time you use the integration.
I’m getting the “unable to share vehicle” error in the Tesla iOS App.
I checked all the web server logs and can’t find anything happening at the time of the error. Anyone have a clue on how to debug this?
Are you able to share your Apache logs. Can you download your pem file? https://hostname.yourdomain.com/.well-known/appspecific/com.tesla.3p.public-key.pem
Thank you so much for this guide. I’m having the same issue others seem to be having with the “unable to share vehicle”. I’ve dug through the logs
1) Verified that apache is running. I set up the files per the instructions in terminal/vim.
2) Set up a second host in cloudflare
3) Registered with Telsa & got the relevant info
4) Created the QR code
5) Cannot add the vehicle.
Here is the log from the Apache2 Minimal add on
Tue Jul 16 15:05:56.884250 2024] [authz_core:error] [pid 141:tid 141] [client 172.30.32.1:46554] AH01630: client denied by server configuration: /share/tesla/
172.30.32.1 – – [16/Jul/2024:15:05:56 -0700] “HEAD / HTTP/1.1” 403 –
[Tue Jul 16 15:05:56.894293 2024] [authz_core:error] [pid 141:tid 141] [client 172.30.32.1:46554] AH01630: client denied by server configuration: /share/tesla/
172.30.32.1 – – [16/Jul/2024:15:05:56 -0700] “HEAD / HTTP/1.1” 403 –
[Tue Jul 16 15:06:09.673104 2024] [authz_core:error] [pid 138:tid 138] [client 172.30.32.1:51032] AH01630: client denied by server configuration: /share/tesla/
172.30.32.1 – – [16/Jul/2024:15:06:09 -0700] “HEAD / HTTP/1.1” 403 –
[Tue Jul 16 15:06:09.673856 2024] [authz_core:error] [pid 140:tid 140] [client 172.30.32.1:51040] AH01630: client denied by server configuration: /share/tesla/
172.30.32.1 – – [16/Jul/2024:15:06:09 -0700] “HEAD / HTTP/1.1” 403 –
172.30.32.1 – – [16/Jul/2024:15:08:10 -0700] “GET /.well-known/appspecific/com.tesla.3p.public-key.pem HTTP/1.1” 404 279
172.30.32.1 – – [16/Jul/2024:15:08:11 -0700] “GET /.well-known/appspecific/com.tesla.3p.public-key.pem HTTP/1.1” 404 279
172.30.32.1 – – [16/Jul/2024:15:08:13 -0700] “GET /.well-known/appspecific/com.tesla.3p.public-key.pem HTTP/1.1” 404 279
172.30.32.1 – – [16/Jul/2024:15:08:17 -0700] “GET /.well-known/appspecific/com.tesla.3p.public-key.pem HTTP/1.1” 404 279
172.30.32.1 – – [16/Jul/2024:15:08:25 -0700] “GET /.well-known/appspecific/com.tesla.3p.public-key.pem HTTP/1.1” 404 279
172.30.32.1 – – [16/Jul/2024:15:08:41 -0700] “GET /.well-known/appspecific/com.tesla.3p.public-key.pem HTTP/1.1” 404 279
172.30.32.1 – – [16/Jul/2024:15:09:13 -0700] “GET /.well-known/appspecific/com.tesla.3p.public-key.pem HTTP/1.1” 404 279
[Tue Jul 16 15:10:03.387744 2024] [authz_core:error] [pid 144:tid 144] [client 172.30.32.1:46230] AH01630: client denied by server configuration: /share/tesla/callback
172.30.32.1 – – [16/Jul/2024:15:10:03 -0700] “GET /callback?code=NA_67e8e81f4a111b88de94f680c1e6a014f091fae3f22f82d6a65cca8d31fc&state=aee3feef87&issuer=https%3A%2F%2Fauth.tesla.com%2Foauth2%2Fv3 HTTP/1.1” 403 282
172.30.32.1 – – [16/Jul/2024:15:10:17 -0700] “GET /.well-known/appspecific/com.tesla.3p.public-key.pem HTTP/1.1” 404 279
172.30.32.1 – – [16/Jul/2024:15:12:26 -0700] “GET /.well-known/appspecific/com.tesla.3p.public-key.pem HTTP/1.1” 404 279
172.30.32.1 – – [16/Jul/2024:15:14:47 -0700] “GET /.well-known/appspecific/com.tesla.3p.public-key.pem HTTP/1.1” 404 279
172.30.32.1 – – [16/Jul/2024:15:14:48 -0700] “GET /.well-known/appspecific/com.tesla.3p.public-key.pem HTTP/1.1” 404 279
172.30.32.1 – – [16/Jul/2024:15:14:50 -0700] “GET /.well-known/appspecific/com.tesla.3p.public-key.pem HTTP/1.1” 404 279
172.30.32.1 – – [16/Jul/2024:15:14:54 -0700] “GET /.well-known/appspecific/com.tesla.3p.public-key.pem HTTP/1.1” 404 279
172.30.32.1 – – [16/Jul/2024:15:15:02 -0700] “GET /.well-known/appspecific/com.tesla.3p.public-key.pem HTTP/1.1” 404 279
172.30.32.1 – – [16/Jul/2024:15:15:18 -0700] “GET /.well-known/appspecific/com.tesla.3p.public-key.pem HTTP/1.1” 404 279
[Tue Jul 16 15:15:37.613127 2024] [authz_core:error] [pid 141:tid 141] [client 172.30.32.1:43216] AH01630: client denied by server configuration: /share/tesla/callback
172.30.32.1 – – [16/Jul/2024:15:15:37 -0700] “GET /callback?code=NA_f4fef89480ef8ce468ae9e7337294ba2c11dc0cb2c71979b2685378381f9&state=65f1b84255&issuer=https%3A%2F%2Fauth.tesla.com%2Foauth2%2Fv3 HTTP/1.1” 403 282
172.30.32.1 – – [16/Jul/2024:15:15:50 -0700] “GET /.well-known/appspecific/com.tesla.3p.public-key.pem HTTP/1.1” 404 279
172.30.32.1 – – [16/Jul/2024:15:16:55 -0700] “GET /.well-known/appspecific/com.tesla.3p.public-key.pem HTTP/1.1” 404 279
172.30.32.1 – – [16/Jul/2024:15:19:03 -0700] “GET /.well-known/appspecific/com.tesla.3p.public-key.pem HTTP/1.1” 404 279
172.30.32.1 – – [16/Jul/2024:15:23:19 -0700] “GET /.well-known/appspecific/com.tesla.3p.public-key.pem HTTP/1.1” 404 279
[Tue Jul 16 15:26:42.216934 2024] [authz_core:error] [pid 142:tid 142] [client 172.30.32.1:41120] AH01630: client denied by server configuration: /share/tesla/
172.30.32.1 – – [16/Jul/2024:15:26:42 -0700] “GET / HTTP/1.1” 403 282
[Tue Jul 16 15:26:44.780439 2024] [authz_core:error] [pid 142:tid 142] [client 172.30.32.1:41120] AH01630: client denied by server configuration: /share/tesla/
172.30.32.1 – – [16/Jul/2024:15:26:44 -0700] “GET / HTTP/1.1” 403 282
172.30.32.1 – – [16/Jul/2024:15:31:51 -0700] “GET /.well-known/appspecific/com.tesla.3p.public-key.pem HTTP/1.1” 404 279
And here is the log from Tesla HTTP Proxy
curl: (22) The requested URL returned error: 404
Warning: Problem (retrying all errors). Will retry in 8 seconds. 11 retries
Warning: left.
curl: (22) The requested URL returned error: 404
Warning: Problem (retrying all errors). Will retry in 16 seconds. 10 retries
Warning: left.
HTTP/2 404
date: Tue, 16 Jul 2024 22:15:02 GMT
content-type: text/html; charset=iso-8859-1
cf-cache-status: DYNAMIC
report-to: {“endpoints”:[{“url”:”https:\/\/a.nel.cloudflare.com\/report\/v4?s=8Fu1HQpCLkOL8tXZm95QA6tbKGwkHseqqDvvffdXNx5V%2BXXJ8DXvqY%2B112t5JD7KIfkrB8NkYtV5U4vhvOQlPm%2FC2xoaCzbY0v6LYRtgRDkJunMU335scKELgA65I97mGx73AuFo”}],”group”:”cf-nel”,”max_age”:604800}
nel: {“success_fraction”:0,”report_to”:”cf-nel”,”max_age”:604800}
server: cloudflare
cf-ray: 8a455941cd19c731-SEA
alt-svc: h3=”:443″; ma=86400
[15:15:08] werkzeug:INFO: 172.30.32.2 – – [16/Jul/2024 15:15:08] “GET / HTTP/1.1” 200 –
HTTP/2 404
date: Tue, 16 Jul 2024 22:15:18 GMT
content-type: text/html; charset=iso-8859-1
cf-cache-status: DYNAMIC
report-to: {“endpoints”:[{“url”:”https:\/\/a.nel.cloudflare.com\/report\/v4?s=ExEV8uEztm4OhAdphlTZyqZ33Asg33HcZR7Y%2Fv3a3EAiiJzwCWpU7YMzMGvr%2F1aFl%2FaWbM3WGvW2MrGwvF1GUskHZlzAjAHbCDeh9WpxnwsNnVK6CWeu6HDiXBUsQUMWhXKU4Eeh”}],”group”:”cf-nel”,”max_age”:604800}
nel: {“success_fraction”:0,”report_to”:”cf-nel”,”max_age”:604800}
server: cloudflare
cf-ray: 8a4559a65951c731-SEA
alt-svc: h3=”:443″; ma=86400
curl: (22) The requested URL returned error: 404
Warning: Problem (retrying all errors). Will retry in 32 seconds. 9 retries
Warning: left.
[15:15:47] webui:WARNING: Obtained refresh token: NA_3c43e65090d981cf836de1317fd8ec0085b88d1db6a3630c87d7633df2901e94
[15:15:47] werkzeug:INFO: 172.30.32.2 – – [16/Jul/2024 15:15:47] “GET /callback?callback_url=https://tesla.moshousley.us/callback?code%3DNA_f4fef89480ef8ce468ae9e7337294ba2c11dc0cb2c71979b2685378381f9%26state%3D65f1b84255%26issuer%3Dhttps%253A%252F%252Fauth.tesla.com%252Foauth2%252Fv3 HTTP/1.1” 200 –
HTTP/2 404
date: Tue, 16 Jul 2024 22:15:50 GMT
content-type: text/html; charset=iso-8859-1
cf-cache-status: DYNAMIC
report-to: {“endpoints”:[{“url”:”https:\/\/a.nel.cloudflare.com\/report\/v4?s=60PQRnsZd4s5EbXsYm6oOkm5p1ZY0r469DAen3y5bLuvlM5q%2BuJrzk7iBWkE%2BvJnysplGPeIxcnP5qD9AZH1%2BlXXP%2BcHbshifcphnaDRo%2Fj0AALRh%2BT8M87KEc2LG0u8sn2wsczX”}],”group”:”cf-nel”,”max_age”:604800}
nel: {“success_fraction”:0,”report_to”:”cf-nel”,”max_age”:604800}
server: cloudflare
cf-ray: 8a455a6f1a35c731-SEA
alt-svc: h3=”:443″; ma=86400
curl: (22) The requested URL returned error: 404
Warning: Problem (retrying all errors). Will retry in 64 seconds. 8 retries
Warning: left.
[15:16:17] werkzeug:INFO: 172.30.32.2 – – [16/Jul/2024 15:16:17] “GET / HTTP/1.1” 200 –
HTTP/2 404
date: Tue, 16 Jul 2024 22:16:55 GMT
content-type: text/html; charset=iso-8859-1
cf-cache-status: DYNAMIC
report-to: {“endpoints”:[{“url”:”https:\/\/a.nel.cloudflare.com\/report\/v4?s=iihaDAu2z53ygG1fVqIb5%2FAkSj7H8WC1AvCiMyieQ4HVSX31A7WW0pmvUzdycUNkduTZIbGa5TvdXrDBLveZfeTqxoI4Hu9vjUGPMNTL39XSCCiNUbI%2FCUEUIi%2BROAdxY2EHuXhX”}],”group”:”cf-nel”,”max_age”:604800}
nel: {“success_fraction”:0,”report_to”:”cf-nel”,”max_age”:604800}
server: cloudflare
curl: (22) The requested URL returned error: 404
Warning: Problem (retrying all errors). Will retry in 128 seconds. 7 retries
Warning: left.
cf-ray: 8a455bfffbadc731-SEA
alt-svc: h3=”:443″; ma=86400
HTTP/2 404
date: Tue, 16 Jul 2024 22:19:03 GMT
content-type: text/html; charset=iso-8859-1
cf-cache-status: DYNAMIC
report-to: {“endpoints”:[{“url”:”https:\/\/a.nel.cloudflare.com\/report\/v4?s=hl2o%2BSbZjdBe4pesnnBbwofIz5G14CcogXjQ3idDF0cUjwDJ1xXwIQfbYrDugbwXYrRU3gFln2FtuD8goiPC0nPQvC3lQpDtr496tpTc8nyCom9lfemEJVeetbxIJD2U93jzDh6n”}],”group”:”cf-nel”,”max_age”:604800}
nel: {“success_fraction”:0,”report_to”:”cf-nel”,”max_age”:604800}
server: cloudflare
cf-ray: 8a455f21d8d1b993-SEA
alt-svc: h3=”:443″; ma=86400
curl: (22) The requested URL returned error: 404
Warning: Problem (retrying all errors). Will retry in 256 seconds. 6 retries
Warning: left.
HTTP/2 404
date: Tue, 16 Jul 2024 22:23:19 GMT
content-type: text/html; charset=iso-8859-1
cf-cache-status: DYNAMIC
report-to: {“endpoints”:[{“url”:”https:\/\/a.nel.cloudflare.com\/report\/v4?s=AkitB%2BvoSDAL8RGzenqj0YW%2Fvhfjo3GHGN5Yvg8wrmAHpYHvIH7p6%2BSir0ED9v2UzwndH%2BgVlM9W%2Fc2ozY3NgD99npWdoDAcLvxQRz1sGv5qh%2BdSMCpOilXsbNB16b0TiPTBq395″}],”group”:”cf-nel”,”max_age”:604800}
nel: {“success_fraction”:0,”report_to”:”cf-nel”,”max_age”:604800}
server: cloudflare
cf-ray: 8a456563cbd27579-SEA
alt-svc: h3=”:443″; ma=86400
curl: (22) The requested URL returned error: 404
Warning: Problem (retrying all errors). Will retry in 512 seconds. 5 retries
Warning: left.
[15:30:14] werkzeug:INFO: 172.30.32.2 – – [16/Jul/2024 15:30:14] “GET / HTTP/1.1” 200 –
HTTP/2 404
date: Tue, 16 Jul 2024 22:31:52 GMT
content-type: text/html; charset=iso-8859-1
cf-cache-status: DYNAMIC
report-to: {“endpoints”:[{“url”:”https:\/\/a.nel.cloudflare.com\/report\/v4?s=OqVkpqPExZvnOiZZ0WLWWy9WHkEhQScGA%2B7bVP1xw%2Bamlg53EHxdld1QU0EOvfSZS0FuS9vgS5abtUewLIfx%2F0KAM6tgzaqzS7qO03GAb9SgWp7kGZAQHnjVgvGo4f950X8NQj6V”}],”group”:”cf-nel”,”max_age”:604800}
nel: {“success_fraction”:0,”report_to”:”cf-nel”,”max_age”:604800}
server: cloudflare
cf-ray: 8a4571e5bd9f76ee-SEA
alt-svc: h3=”:443″; ma=86400
curl: (22) The requested URL returned error: 404
Warning: Problem (retrying all errors). Will retry in 600 seconds. 4 retries
Warning: left.
I would appreciate any assistance from the crowd.
Thank you for this guide and the related guide “Home Assistant with Cloudflare Zero Trust”.
I’m having some issues getting the Tesla Integration working following this guide and hoping for some help.
1. I’ve created a second Cloudflare zero trust tunnel for tesla.mydoman.com with service “http://homeassistant.local:80”
– note in cloadflare the zero trust tunnel status for this is “inactive” ?
2. The Apache2 Minimal add-on appears to be running OK, is there anyway to test to see if this is working OK?
– logs
s6-rc: info: service s6rc-oneshot-runner: starting
s6-rc: info: service s6rc-oneshot-runner successfully started
s6-rc: info: service fix-attrs: starting
s6-rc: info: service fix-attrs successfully started
s6-rc: info: service legacy-cont-init: starting
s6-rc: info: service legacy-cont-init successfully started
s6-rc: info: service legacy-services: starting
s6-rc: info: service legacy-services successfully started
No username and/or password was provided. Skipping account set up.
SSL is deactivated and/or you are using a custom config.
Your custom apache config at /share/apache2/000-default.conf will be used.
Here is your web file architecture.
total 0
Starting Apache2…
[Sat Jun 22 15:27:55.040235 2024] [mpm_prefork:notice] [pid 79] AH00163: Apache/2.4.59 (Unix) OpenSSL/3.3.0 mod_wsgi/5.0.0 Python/3.12 configured — resuming normal operations
[Sat Jun 22 15:27:55.040278 2024] [core:notice] [pid 79] AH00094: Command line: ‘/usr/sbin/httpd -D FOREGROUND’
3. The Tesla HTTP Proxy add-on starts however there are errors.
– logs
curl: (22) The requested URL returned error: 530
Warning: Problem (retrying all errors). Will retry in 600 seconds. 4 retries
Warning: left.
HTTP/2 530
date: Sat, 22 Jun 2024 05:47:14 GMT
content-type: text/plain; charset=UTF-8
content-length: 16
report-to: {“endpoints”:[{“url”:”https:\/\/a.nel.cloudflare.com\/report\/v4?s=redacted”}],”group”:”cf-nel”,”max_age”:604800}
nel: {“success_fraction”:0,”report_to”:”cf-nel”,”max_age”:604800}
x-frame-options: SAMEORIGIN
referrer-policy: same-origin
cache-control: private, max-age=0, no-store, no-cache, must-revalidate, post-check=0, pre-check=0
expires: Thu, 01 Jan 1970 00:00:01 GMT
server: cloudflare
cf-ray: 8979f1487f9756e3-CBR
alt-svc: h3=”:443″; ma=86400
4. Tesla developer account – this is created and as far as I can tell this is OK
5. Enrolling public key in your vehicle – this does not work
– Error, unable to share vehicle
On the cloudflare Zero Trust -> Networks -> Tunnels page it must show ‘Healthy’. You should also be able to access your home assistant instance via CloudFlare. Also if homeassistant.local doesn’t work try the IP address.
Thanks TUX, issue now resolved.
I’d made a mistake in step 3.2-3.3. Originally I added a new tunnel in cloudflare for tesla.mydomain.com instead of configuring another public host name against the existing tunnel for remote access to home assistant. Fixing this I could now register my car.
I did however have issues after that in step 6.3. The tesla custom integration would not accept my email address and refresh token.
I followed step 6.2 and didn’t select “Use Fleet API proxy” but this method didn’t work.
In step 6.2 I selected “Use Fleet API proxy” and this worked for me.
Thanks and love the concept and your work at smart motion life.
Cheers
Great! I’ve made a note within 6.2 to call this out since it must be required for some vehicles.
Thank so much for creating this guide. I am slowly working my way through it but I have one question.
In your section: “Create your apache.conf file” you do not explain how to do this. I can SSH to my HA, manually create the folder Apache2 in the Share folder but then I am not sure how to create the 000default.conf file. I assumed it was just a plain text file so I edited and then pasted your code in but when I start the Apache Minimal add-on in HA I get the following error in the log:
s6-rc: info: service s6rc-oneshot-runner: starting
s6-rc: info: service s6rc-oneshot-runner successfully started
s6-rc: info: service fix-attrs: starting
s6-rc: info: service fix-attrs successfully started
s6-rc: info: service legacy-cont-init: starting
s6-rc: info: service legacy-cont-init successfully started
s6-rc: info: service legacy-services: starting
s6-rc: info: service legacy-services successfully started
You haven’t put your website to /share/tesla
DEBUGGING: fullchain.pem tesla.xxxxx.co.uk true
A default website will now be used
SSL is deactivated and/or you are using a custom config.
Your custom apache config at /share/apache2/000-default.conf will be used.
Here is your web file architecture.
total 8
-rwxr-xr-x 1 root root 7057 Jun 15 12:10 index.html
Starting Apache2…
httpd: Syntax error on line 484 of /etc/apache2/httpd.conf: Syntax error on line 1 of /etc/apache2/sites-enabled/000-default.conf: /etc/apache2/sites-enabled/000-default.conf:1: was not closed.
Ok I managed to edit the apache conf file and fix the formatting. The Apache add-on is now running successfully but should I be worried about a couple of warnings in the log. Do I have to add this path into the Cloudflare set-up?
Starting Apache2…
AH00112: Warning: DocumentRoot [/share/tesla/] does not exist
AH00112: Warning: DocumentRoot [/share/tesla/] does not exist
[Sat Jun 15 12:56:14.876215 2024] [mpm_prefork:notice] [pid 81] AH00163: Apache/2.4.59 (Unix) OpenSSL/3.3.1 mod_wsgi/5.0.0 Python/3.12 configured — resuming normal operations
[Sat Jun 15 12:56:14.876350 2024] [core:notice] [pid 81] AH00094: Command line: ‘/usr/sbin/httpd -D FOREGROUND’
Finally managed to get it working. Let me summarise my problems and solutions in case they are helpful to anyone else in the future.
1. I created the Apache conf file in textedit in macOS and while I told it to save as plain text, when I then looked at it using the vi command via ssh into home assistant, the formatting was messed up.
I edited it directly within terminal and saved it to correct this error.
2. At the end, everything was running correctly and none of the addon logs showed any errors but I kept getting an “unable to share vehicle” response when I tried to enroll the key at the end.
A little more digging and I played around with the default security settings on Cloudflare and lowered them from medium to low. When I ran the add on again, this time the Tesla app responded by registering the new user.
I then proceeded to the Tesla integration, deleted the existing vehicle and added a new one using the fleet API option and everything worked.
After 5 days of banging my head against this add on it was a sweet moment when I sent a command to the car to sound the horn and heard it go off in the garage.
Thanks again!
I did this process a couple times, I finally got the virtual Key (was getting 3rd Party Error) on the car and then go the Integration re added. Does anyone still get Service Call Errors…. I still cannot do certain functions like unlock the door.
Okay I think the issue is they have a limit of calls so I must of exceeded it trying to get it to work and now in jail..
2024-06-15T02:43:29-04:00 [debug] Server returned 429: Too Many Requests: Retry in 62191 seconds
2024-06-15T02:43:29-04:00 [debug] [17ddf96e6c4b768a3379e70998f77edd] Retrying transmission after error: Retry in 62191 seconds
for real like 17 hrs…?
I have the same issue as CHRIS, the folders do not get created in the Apache install:
I have the 000-default.conf file in the /share/apache2/ (I manually created the/share/apache2 directory)
Starting Apache2…
[Mon Jun 10 13:48:54.716513 2024] [mpm_prefork:notice] [pid 79] AH00163: Apache/2.4.59 (Unix) OpenSSL/3.3.1 mod_wsgi/5.0.0 Python/3.12 configured — resuming normal operations
[Mon Jun 10 13:48:54.716540 2024] [core:notice] [pid 79] AH00094: Command line: ‘/usr/sbin/httpd -D FOREGROUND’
[Mon Jun 10 13:54:22.253319 2024] [authz_core:error] [pid 139] [client 172.30.32.1:34188] AH01630: client denied by server configuration: /share/tesla/
172.30.32.1 – – [10/Jun/2024:13:54:22 +0100] “GET / HTTP/1.1” 403 281
[Mon Jun 10 13:54:22.501990 2024] [authz_core:error] [pid 139] [client 172.30.32.1:34188] AH01630: client denied by server configuration: /share/tesla/favicon.ico, referer: https://tesla.rscasse.org/
172.30.32.1 – – [10/Jun/2024:13:54:22 +0100] “GET /favicon.ico HTTP/1.1” 403 281
s6-rc: info: service legacy-services: stopping
s6-rc: info: service legacy-services successfully stopped
s6-rc: info: service legacy-cont-init: stopping
s6-rc: info: service legacy-cont-init successfully stopped
s6-rc: info: service fix-attrs: stopping
s6-rc: info: service fix-attrs successfully stopped
s6-rc: info: service s6rc-oneshot-runner: stopping
s6-rc: info: service s6rc-oneshot-runner successfully stopped
[Mon Jun 10 14:00:43.809634 2024] [mpm_prefork:notice] [pid 79] AH00169: caught SIGTERM, shutting down
s6-rc: info: service s6rc-oneshot-runner: starting
s6-rc: info: service s6rc-oneshot-runner successfully started
s6-rc: info: service fix-attrs: starting
s6-rc: info: service fix-attrs successfully started
s6-rc: info: service legacy-cont-init: starting
s6-rc: info: service legacy-cont-init successfully started
s6-rc: info: service legacy-services: starting
s6-rc: info: service legacy-services successfully started
No username and/or password was provided. Skipping account set up.
SSL is deactivated and/or you are using a custom config.
Your custom apache config at /share/apache2/000-default.conf will be used.
Here is your web file architecture.
total 0
Starting Apache2…
[Mon Jun 10 14:00:49.492295 2024] [mpm_prefork:notice] [pid 79] AH00163: Apache/2.4.59 (Unix) OpenSSL/3.3.1 mod_wsgi/5.0.0 Python/3.12 configured — resuming normal operations
[Mon Jun 10 14:00:49.492317 2024] [core:notice] [pid 79] AH00094: Command line: ‘/usr/sbin/httpd -D FOREGROUND’
You are my hero, pal – You linked me to this post from the Github last night and I followed the guide and couldnt for the life of me get the Tesla Developer app to register (turns out you have to select the country you’re IN when you’re making the app, can’t just select one that doesn’t have a Tax ID. Then I found out what the Regex for the field was and generated a fake tax ID to give me access – use GB123456789 if you are in the UK!!)
Once I got past that step, I had issues like others with my Apache server saying “Forbidden, You don’t have permission to access this resource” – This was not a problem at all and the callback worked fine.
I also got the issue in the Tesla app where it says “Unable to Share Vehicle, This third party isn’t registered with Tesla” – This was literally because in Cloudflare Zero Trust, my public-facing URL was pointing to port 8123 (HomeAssistant) NOT port 80 (Apache). Once I had followed the instructions properly… All working now! Thanks so much for your write up.
Do you know now if I need to keep any of the stuff I installed? Can I remove the Zero Trust URL? Can I remove Tesla HTTP Proxy/Apache if I have no use for it? Thanks!
I have the same error as below when going to http://homeassistant.local:80 locally or tesla.mywebsite.com – Did you manage to fix it?
Forbidden
You don’t have permission to access this resource.
Apache/2.4.59 (Unix) Server at homeassistant.local Port 80
I expect that the problem is with step 2.6. The web server is listening however not accepting traffic on port 80.
I have realized even if it says this, it still works fine as the url on the top is intact and HA/addon is responding. Mine still has this error but the HA integration has been running for over 5 days no issues now.
The main problem was Tesla app not recognizing the QR code (third party error) but that was because of Geofencing in Cloudflare. Possibly best to mention this in the guide in the cloudflare config section.
Thanks heaps for the encouragement! You do need to keep the service running. When you access the Tesla Custom Integration it will send a webhook to your web server to authenticate.
Was anyone able to solve the “This third party isn’t registered with Tesla” error? I can’t fix it…
Have you tried running through this again, I believe there is a timeout so if you are too slow it doesn’t register? Any logs or screen shots would help.
It seems like it’s a problem with the SSL certificate:
curl failed to verify the legitimacy of the server and therefore could not
establish a secure connection to it. To learn more about this situation and
how to fix it, please visit the web page mentioned above.
Warning: Problem (retrying all errors). Will retry in 8 seconds. 11 retries
Warning: left.
curl: (60) SSL certificate problem: self-signed certificate in certificate chain
More details here: https://curl.se/docs/sslcerts.html
Hi there,
Thank you for this detailed tutorial. My apache2 server stops after sometime. It says that there is some syntax error in the logs:
Your custom apache config at /share/apache2/000-default.conf will be used.
Here is your web file architecture.
total 8
-rw-r–r– 1 root root 178 May 28 20:18 com.tesla.3p.public-key.pem
-rw-r–r– 1 root root 851 May 28 20:18 selfsigned.pem
Starting Apache2…
httpd: Syntax error on line 484 of /etc/apache2/httpd.conf: Syntax error on line 23 of /etc/apache2/sites-enabled/000-default.conf: /etc/apache2/sites-enabled/000-default.conf:23: was not closed.
s6-rc: info: service legacy-services: stopping
s6-rc: info: service legacy-services successfully stopped
Any idea what could be going wrong here. I created the config file on textedit, copied the contents on this tutorial, changed the url to my tesla.mydomain.com and changed the extension to conf and transferred to the apache2 directory. Any help would be appreciated.
Hello,
Im also having the Unable to Share Vehicle, This third party isn’t registered with Tesla error, can you give me a hand please?
My suggestion is to run through it again, there is a time out. If not, clear everything up and start from scratch.
This is a very well explained guide!
Unfortunately i’m stuck on the last step… When I scan the QR-code I get an error from Tesla app, claiming, that this is an third party app and its not registered…
Somebody have an Idea of what I did wrong?
Unfortunately I haven’t seen that, my suggestion is to run through it again. There is a timeout and you may have been a bit slow through it (I know I was for the first few goes). Let me know how you go!
Thanks for the detailed description! Would this process result in getting location updates via streaming or via polling?
Yes, the GPS coordinates are sent back via the Tesla Custom Integration https://github.com/alandtse/tesla
Sounds like it is polling only and not streaming, unfortunately. Thanks.
“I’m currently trying to install the Tesla integration in Home Assistant. I’m quite new to this topic, so this guide came in handy for me. I had already set up a tunnel via Cloudflare, and my HA server is externally accessible. Now, I’ve set up a second tunnel and installed the Apache server. It’s now accessible via https://tesla.myaddress.com. What’s not entirely clear to me is where to get the public key stored in com.tesla.3p.public-key.pem. If I generate a key pair with openssl and rename the public key to com.tesla.3p.public-key.pem and copy it to /share/apache2/, then it is also displayed to me via https://tesla.myaddress.com. Additionally, I had to manually create the folders /share/tesla and /share/apache2, was that correct?”
This was an error in the blog that the certificate is available at this time. I’ve removed the step where you test your public key. As you pointed out it is not created at this time.
You should not have to create the directories, do you get an error message if they are not created?
Thanks for the detailed guide. I have been postponing the fleet API as it was hard to follow but your guide was very helpful. I reached successfully until step 5.11 and when I scan the code on my mobile, I get the error ‘Unable to Share Vehicle, This third party isn’t registered with Tesla. We can’t grant them access at this time.’ Any suggestions?
After verifying your public key is accessible, at step 5.4, make sure you enable the Regenerate Tesla Authentication. This step is to register your public key with Tesla for step 5.11.
Also watch out for WAF geofence settings. Check out my discussion topic on github.
https://github.com/llamafilm/tesla-http-proxy-addon/discussions/86#discussion-6562646
Thank you for this tip! Without it I would have got stuck without knowing what the problem was. Perhaps the article could be updated to incorporate this.
Thanks for pointing this out. I’ve updated the image in 5.4 to show that you need to enable the Regenerate Tesla Authentication.
Also, when I go to the cloudflare subdomain created with homeassistant.example.com go to my HA instance but going to the subdomain created with tesla.example.com gets ‘Forbidden, You don’t have permission to access this resource.’ Not sure is this is expected behavior and related to above problem’
I am pretty sure that there is a problem with your webserver setup, possibly in CloudFlare. In your example does the following work for your domain?
https://tesla.smartmotion.life/.well-known/appspecific/com.tesla.3p.public-key.pem
My suggestion is to ensure that through CloudFlare (Access->Applications) there is no restriction on getting to https://tesla.yourdomain.com/
Developer Account steps doesn’t require a Business Number for US, I see the Tax ID for UK though. Also it has the note saying that Tesla API is temporarily free during this trial period. Does that mean this will only work for a while before Tesla charging us for API call? Thanks
I do not believe that Tesla will charge for this. My understanding is that they have tightened security hence the change.
Hello,
seems a nice guide, but only for HA OS users, not for me running HA in a docker container…
I managed to settle Tesla developer needs..
I managed to build a webserver (Apache2), I managed to create Cloudflare tunnel to that server.
I’m stuck at creating the Tesla_http_proxy thing. I need more time and nerves. Only ChatGPT seems endless in energy on that 😉
I’m hitting the same problem: running HA in a docker on my Synology NAS…
Is it even possible to run Tesla HTTP proxy??
It should work ok, let me know how you go after following this – https://www.smartmotion.life/2024/04/23/tesla-custom-integration-with-home-assistant-on-docker/
> seems a nice guide, but only for HA OS users, not for me running HA in a docker container…
I’ve just created a guide for HA on Docker – https://www.smartmotion.life/2024/04/23/tesla-custom-integration-with-home-assistant-on-docker/
You are quite right that it is only for HA OS, I’ll update the guide. I need to think about how this can be adapted to those running containers!